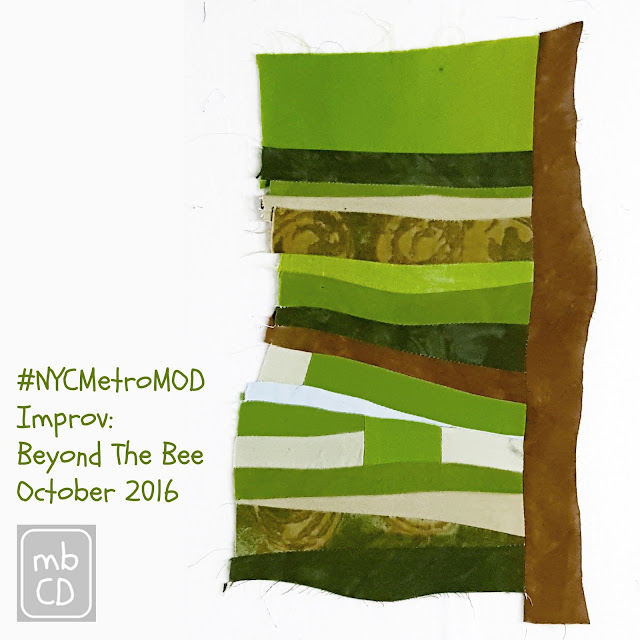
This is my February Improv: Beyond The Bee block for Judy.
teaching sewing confidence, tip by tip
Showing posts with label NYC Metro Mod Bee. Show all posts
Showing posts with label NYC Metro Mod Bee. Show all posts
Monday, 3 April 2017
Friday, 31 March 2017
Improv: Beyond The Bee - January Bee Block #NYCMetroMOD
There was no bee block for December, so the next one I have to share is now my absolute favourite.
This is my January Improv: Beyond The Bee block for Greer.
Monday, 20 March 2017
Friday, 17 March 2017
Improv: Beyond The Bee - October Bee Block #NYCMetroMOD
Do you see a tree, fields and a glimpse of pale blue sky? I do and it reminds me of my home in England. It's my October Improv: Beyond The Bee block for Cynthia.
Monday, 13 March 2017
Improv: Beyond The Bee - September Bee Block #NYCMetroMOD
I'm up-to-date with making and returning my Bee Blocks but way behind in sharing them with you. About time I put that right - this is my September Improv: Beyond The Bee block for Queen Bee Chris, yes me!
Monday, 8 August 2016
Improv: Beyond The Bee - July 2016 (NYC Metro MOD Quilt Guild)
Just between us let's pretend it's still July and talk about my July Improv: Beyond The Bee block for Caroline.
Monday, 18 July 2016
Improv: Beyond The Bee - June 2016 (NYC Metro MOD Quilt Guild)
June was a busy month, making many projects ready for Christmas in July and July's busy also promoting them. I took a break from Christmas today to catch up on my outstanding June Improv: Beyond The Bee block.
Monday, 6 June 2016
Improv: Beyond The Bee - May 2016 (NYC Metro MOD Quilt Guild)
Most of you know I'm a member of the NYC Metro MOD Quilt Guild and from 2012-15 I was in our Guild's first Bee and I shared how I made each block with you here on this page. I've taken a year off from being in a Bee but when Guild members Jenny and Jessica announced they were starting a brand new Guild Bee I couldn't resist joining so today I'm introducing
Monday, 4 April 2016
Friday, 4 March 2016
February 2016 Progress Update
The weather has continued to be very uncooperative when it comes to photographing my work and I'm never happy with my indoor photos of large quilts so for now some projects are still nothing more than a sneak peek tease. There have been a few January finishes I've been able to fully share though so you can now click the pics below to read more about these finishes:
Tuesday, 2 February 2016
January 2016 Progress Update
Sharing my UFO/WIP list with you two weeks ago was quite shocking - the shock for me, as I said, was the length of the list. It's unclear what spurred me on most, the length of the list; accountability to my readers or the snow that kept me deep inside my warm apartment but whatever it was this has been my most productive 14 days in a very, very long time.
Sunday, 12 April 2015
February's Bee Block - NYC Metro MOD Quilt Guild
Quite late making my February Bee Block for Queen Bee Ariana, haven't done any sewing for 5 weeks due to travelling and health issues but with several deadlines looming this was an easy project to get me gently back into sitting at the sewing machine.
Ariana provided the fabric - not 100% sure but I'd guess they're peppered cottons, I love the texture and softness.
The brief was to make a square within a square - the inner square to be abstract or geometric and any size while the outer square must take the overall block size to 9.5".
This is my finished block - initially I wanted to just do the tiny 9 patch surrounded with the outer square but, having created it using 3.4" strips which produce tiny 1/4" squares, there just wasn't enough of the outer fabric to complete the block :( . As you can see I added more sections to the 9 patch to create a larger centre square which enabled me to achieve a 9.5" finished block.
See just how tiny those squares are compared to a US dime and a British penny. You can also see how the fabric distorts given it's weave and softness.

Fingers crossed Ariana likes it.
Click below to visit a new page of crafty goodness :)
Sunday, 15 March 2015
Purse Strings January's Bee Block - NYC Metro MOD Quilt Guild

When my January Bee Block package for my NYC Metro MOD Quilt Guild Bee arrived from King Bee Brian I was delighted to see the tutorial he wanted us to use was by a long time bloggy friend of mine, Kelly @My Quilt Infatuation.
So no tutorial from me this month, instead if you want to recreate the block head straight over to Kelly's blog and follow her Purse Strings Block tute.
Fabrics and notes from King Bee Brian.

I added two of my own fabrics - instructions said to stick with red and white.

I sewed a second seam a 1/2" from the first HST seam to create the 'bonus' HSTs above that Brian wants to include in the quilt.
An easy block with great impact.
Update May 2016
King Bee Brian brought his finished quilt to our May 2016 NYC Metro MOD Quilt Guild meeting. It's absolutely stunning. Can you spot my block? It's the one right in the centre.
Clicking on an image will take you to the new page of crafty goodness :)
Tuesday, 25 November 2014
Giant HST Quilt Tutorial - (AKA My Turn To Be Queen Bee)
Hard to believe it's almost December again and that means it's my turn to be Queen Bee in our NYC Metro Mod Quilt Guild Bee.
I want a quilt that’s abstract, bold and bright so I've designed this Giant HST quilt. At this extra busy time of year, I like to make my Bee Blocks super quick and easy and it really doesn't come much easier than HSTs plus they have such great impact.
When my daughter Flicky went off to uni she took her quilt with her (My Very First Ever Quilt) so I want to replace it for her trips home and I'm asking my Bee friends to help me.
My inspiration is this 3.5' x 3.5' box framed copy of Warhol's Marilyn Monroe hanging in our apartment over Flicky's bed.
I’ve sent everyone a fat quarter (fq) of Charcoal Kona Solid and asked them to add a fq from their given colour group to make me two giant HST blocks. Colours are divided into four groups so I’ll hopefully receive blocks across the full-colour range and not 22 blocks of one colour!
Bee Members are to choose a colour from their colour group:
Group 1: Red/Orange/Yellow - Earamichia/Judith/Kim
Group 2: Pink/Purple – Andrea/Maria/Rossanna
Group 3: Lime/Green/Turquoise – Brian/Ariana/Maren
Group 4: Blue/Aqua – Emily N/Emily K
I've asked everyone to keep fabric colours rich – I’m looking for saturation and intense colour and brightness within these colour palettes. They can use solids or tone on tone prints – brights with an intensity of colour, trying not to use pastels or white. I’ve used a tiny amount of white in a handful of my sample blocks but the overall feel of these fabrics is still of vibrant colour and the white isn’t the main player.
I also want seams pressed open (so the finished blocks will lie as flat as possible) and blocks returned to me untrimmed.
If you've stuck with me this far you might be looking for the tute here it is!!!
Giant HST Quilt Tutorial
Materials:
For my quilt Kona Solid Charcoal is the 'main' fabric used in every HST block then I've used a selection of brights. For each block, you'll need 2 fqs - 1 x main and 1 x bright.
To make this 36 x HST square quilt top you'll need:
4.5 yds main fabric and 18 bright fqs (equivalent to 4.5 yds)
The finished quilt top size will be 96" x 96".
Making The Blocks:
Cut your main fq and your bright fq down to two 17.5” square blocks. This is a slightly larger square than you need to make a 16.5" finished HST block but cutting at 17.5" is visually easier and will give extra wiggle room when trimming down to size, by all means cut smaller if you're confident in your cutting and sewing.
I'm cutting through 3 layers at a time here as you can see above.
To cut my 17.5" squares I've lined up my 12.5" square ruler along it's 11.5" line and then placed my long 6" wide ruler next to it - giving me a 17.5" line.
Above you can see how I've used the 11.5" line of the ruler along the edge of the fabric.
Draw a pencil line across one diagonal of the 17.5" square. If your ruler isn't long enough then use another ruler to extend fully across the fabric as I have above.
Place the two fat quarters right sides together (consider the drawn line to be the ‘wrong’ side of your main fabric block).
Sew a ¼” seam on one side of your drawn line using your drawn line as your guide.
Then repeat a 1/4" sewn seam on the other side of the drawn line.
This is how your sewn blocks will look with two parallel lines of stitching.
Cut along your drawn line to create 2 giant HSTs.
Press seams open to create a flatter block and subsequent smoother quilt finish for this modern quilt.
Trim blocks down to 16.5" squares.
Below is a photo of the blocks I've made - I need 36 blocks in total and my fellow Bees will be making me 22 (hopefully!) so I've made 14 blocks myself to finish the quilt.
Completing The Quilt Top:
Joining the blocks - use a 1/4" seam to join all blocks in a row, then join all rows to form the quilt top. Pay particular attention to the seams, nesting and pinning as necessary to ensure accurate seam joints - (see my Easy Scrappy Nine Patches tute to learn how to nest seams). Press seams open.
As always you can check out all the blocks that our Bee make for my Giant HST Quilt on my Quilty - Giant HST Block Pinterest Board - I'll add more pins as each person in the Bee posts photos of their finished blocks and you can see my NYC Mod Quilt Guild post here too.
Clicking on an image will take you to through to the new page of crafty goodness :)
Clicking on an image will take you to through to the new page of crafty goodness :)
Labels:
Bee Blocks,
daughter,
First quilt,
Flicky,
Giant HST,
HST,
Kona,
Marilyn Monroe,
NYC Metro Mod Bee,
NYC Metro MOD Quilt Guild,
Queen Bee,
Tute,
Tutorial,
Warhol


