Simple, Clean, Modern
Just One Block Quilt Pattern
(approx 71" x 71")
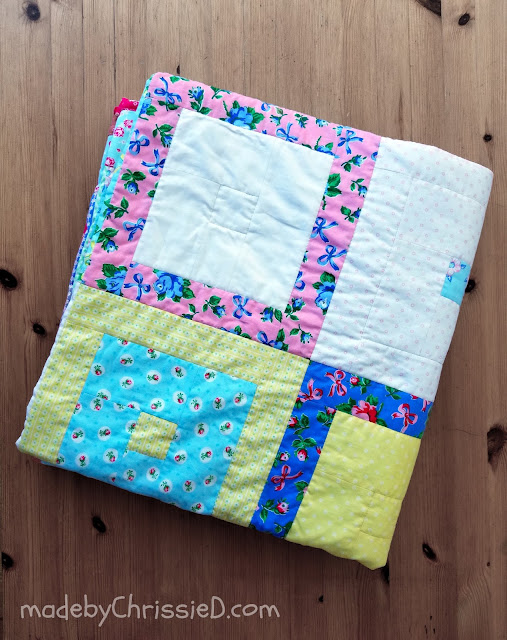
Just One Block is a large square quilt based on my original Kukulcan quilt block pattern. As the name suggests, the quilt comprises just one Block, with each block section mixed and matched to create 3 individual block patterns. You can style it up or down, adapting to suit adults or children, depending on your chosen fabrics. Adapting my original Kukulcan block' 12" finish, the Just One Block block 10-3/4" makes the quilt pattern Fat Quarter friendly. Simple techniques will appeal to beginner and more experienced quilters, and I'll walk you through each stage with diagrams, photo tutes and lots of mbCD tips.
Disclosure/Disclaimer:
Fabrics for the First Blush version of the Just One Block quilt were provided by Windham Fabrics, and fabrics for the Kukulcan Block were provided by Benartex Fabrics, both at no cost to mbCD. All other materials are my own. In all other respects, this post is for informational purposes only, and no payment or commission is received on click-throughs to links shared.
Take one quilt block, cut it out three times and swap the pieces around to make three different blocks. Make another three blocks and another, and before you know it, you've got a quilt; let's call it the
Just One Block Quilt
NB: Want to make the Just One Block quilt without all the tips and tutes?
Click through here for the basic pattern instructions without diagrams, etc.
Materials
Design Option 1 (see Design Elements) - 24 Fat Quarters (12 background and 12 contrast)
OR Design Option 2 (see Design Elements) - 18 Fat Quarters (12 background and 6 contrast)
Border Fabric - 3/4 yard
Binding Fabric - based on 2-1/4" binding - exactly 1/2 yard with no margin for error
OR based on 2-1/2" binding - 5/8 yard.
Backing - 4 yards minimum - this 71" x 71" quilt requires a minimum of (2) x 2 yard (72") lengths of 42"/44" wide fabric. This minimum allows no lengthwise margin for error, wiggle room or long arm quilting excess.
Design Elements
The basis of the pattern is that 2 Fat Quarters (FQs) will yield 3 blocks. However, depending on your overall design and fabric choices, 3 FQs may produce 6 blocks. This gives you two design options using one or multiple background and contrast fabrics and requiring 18 or 24 FQs to complete the centre panel of the quilt top.
Design Option 1: One OR Multiple Background Fabrics and Multiple Contrast Fabrics
24 FQs will yield 36 blocks, one of each type, an inner, middle and outer
12 FQs will be your background fabric, and you will cut 24 blocks from these - there will be minimal wastage (see my cutting chart below)
12 FQs will be your contrast, and you will cut 12 blocks from these - half of each FQ is unused
Design Option 2: One OR Multiple Background Fabrics and One Contrast Fabric
18 FQs will yield 36 blocks, one of each type, an inner, middle and outer
12 FQs will be your background fabric, and you will cut 24 blocks from these - there will be minimal wastage (see my cutting chart below)
6 FQs will be your contrast, and you will cut 12 blocks from these - there will be minimal wastage (see my cutting chart below)
Background Fabrics
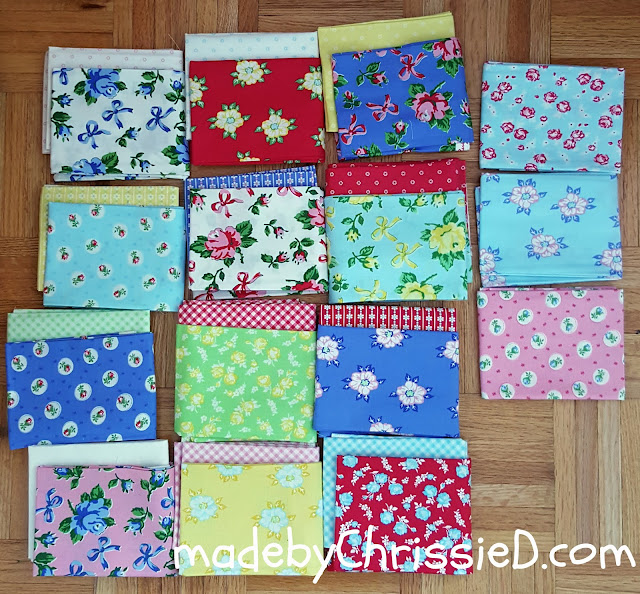
Make a pile of your background fabrics - it is good if there is some commonality, a colour, design element, print size, etc. For the First Blush version, I used check and dot fabrics as my background fabric - the prints are small and dense.
The First Blush fabric collection is designed by Ruby Red Designs for Windham Fabrics.
Contrast Fabrics
Make a pile of your contrast fabrics - again, there should be some commonality, and for the First Blush version, I used floral prints with a slightly larger and wider set design than the background fabric.
Pairing Fabrics
Next, pair a background fabric with a contrast fabric - consider how the colours work together in pairs and how those colours will look as a block when placed alongside all the other pairs made into blocks. In the First Blush version, I tried to ensure that each colour paired with another colour on one occasion only - so there'd be no colour duplicates once the blocks were made, eg red and green are only placed together once. I also tried to create the highest contrast I could in my choices - just look at that yellow background with a deep blue floral contrast.
TIP:
Take a photo of your final pairing choices, as I did, so you can refer back to it. When you start cutting, it's easy to lose track of what goes with what.
Be prepared to change your choices if necessary as you work - when I came to make the Block using the dark red fabric (top left), I realised the contrast on that print colourway was far greater than for the other colourways I was using. It stood out like a sore thumb against the rest of the blocks (there it is again, bottom right of the pic below). Also, in the pic above, the 3 fabrics on the right are extras that I was auditioning for borders and backing; you'll see in my finish photos I went with the top right fabric.
Time to audition some alternate colourways, and I swapped it out for the blue colourway of the same print (bottom right).
Tools
cutting mat / rotary cutter / small scissors or clippers
cutting ruler / marking pencil or pen / pins / neutral thread
Cutting Instructions
Design Option 1:
Background Fabric FQs are detailed in Cutting Diagram 1 below for each FQ cut-out piece.
Contrast Fabric FQs - as detailed in Cutting Diagram 2 below for each FQ cut-out piece.
Design Option 2:
Background and Contrast Fabric FQS - for each FQ cut out pieces as detailed in Cutting Diagram 1 below
Cutting Diagram 1 (2 blocks/FQ)
TIP:
To speed things up, I drew the layout onto the back of an FQ with pencil, then layered and rotary cut through 3 FQs at a time.
Cutting Diagram 2 (1 block/FQ)
Borders
WOF = Width of Fabric and is assumed to be 40"
Piece (7) WOF x 3-1/2" strips into a long strip (approx 280") and cut required lengths:
(2) 65" x 3-1/2" lengths
(2) 71" x 3-1/2" lengths
Binding
WOF = Width of Fabric and is assumed to be 40"
294" x 2-1/4" length - approx (8) WOF strips
Arranging Your Blocks
Make (36) 11-1/4" unfinished (10-3/4" finished) blocks - 12 of each block type Inner / Middle / Outer.
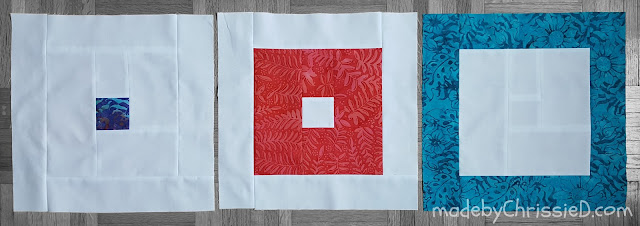
Working in 3s, place 3 full blocks of background cut sections on your design wall in the correct block layout - 2 background fabric blocks and it's paired 1 contrast block. Swap the contrast block pieces with the background block pieces until you have 3 blocks - Inner / Middle / Outer, as detailed in the layout diagrams below.
TIP:
Not necessary, but I placed the B and C pieces in the same places around every A piece, so my blocks are identical in layout.
Block 1: Just One Block Quilt - Inner
Section A - contrast fabric / Section B & C - background fabric
Block 2: Just One Block Quilt - Middle
Section B - contrast fabric / Section A & C - background fabric
Block 3: Just One Block Quilt - Outer
Section C - contrast fabric / Section A & B - background fabric
Piecing The Blocks
Time now to sew the blocks together. Sew each Block together using a 1/4" seam.
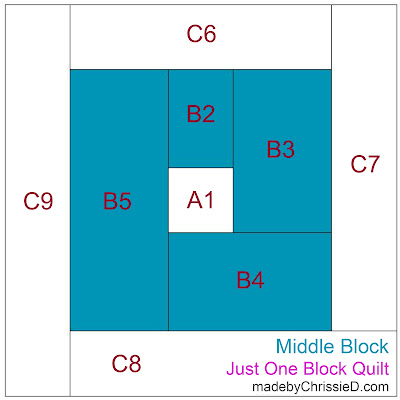
Start by sewing A1 to B2 and working around the Block, adding each piece in numerical order A1 to C9.
Press all seams in your preferred manner; I've pressed my seams open for a flatter, more modern look.
Tip:
1) Chain piece these blocks 3 at a time - working with only 3 blocks made with the same fabrics helps keep things on track; it's easy otherwise for the fabric pieces to become muddled across the 36 blocks.
2) When you have added all the B pieces to the A piece, the Block should measure 7-1/4". It is worthwhile checking the size at this stage to ensure your finished blocks measure up correctly at 11-1/4".
3) As you finish each Block, trim to 11-1/4" square, joining the blocks and later the rows will be easier if the blocks are squared to the same size.
Designing The Layout
This is my design layout for the quilt top showing the placement of the First Blush fabrics using Design Option 1 - multiple background/multiple contrast fabrics.
If you want to use the same design, lay fabric squares out as detailed in the diagram below.
This is another version of Design Option 1, a one background/multiple contrast design. The Kukulcan block design I created previously shows the quilt also without borders and in a different 1/2/3 layout. Here, you can read more about my 12" (finished) Kukulcan Block.
And this is how the Kukulcan blocks 1/2/3 look made up.
Below is an example of just how modern the quilt can look using Design Option 2:
this is a monochrome - one background/one contrast design;
And again in green and white.
Finally, here's a blank layout so you can try out your own fabric placement too.
Joining The Blocks
Join the blocks row by row as shown in the diagram below.
Press seams open or to the side, whichever is your preferred method.
I have pressed my seams open for a flat, modern finish for the First Blush version of the Just One Block quilt. You may want to read my Pros & Cons Guide To Pressing Seams, which includes how to join open pressed seams accurately and how to nest seams.
Joining The Rows
So you've made your 6 rows, and now you need to join them, taking care to match all seams.
I've put the following diagram together, showing you one way to join your row; of course, you can simply sew the rows one to the next if you prefer. If you sew them together in the order indicated, it reduces the weight of fabric to the left of your sewing machine harp/throat at any one time, reducing stress at the needle and for your arms and shoulders when sewing.
If you find the diagram confusing, here it is in words - join rows 1+2, 2+3, 5+6, 4+5 and finally 3+4.
Your quilt top centre is now complete and should look something like this.
Adding The Borders
Add the four borders in the order shown below - the two short borders first and then the longer ones.
Click through to this post to read my tips for adding borders accurately.
Backing Your Quilt
Create your quilt back - I joined two lengths of the same fabric together to create what appears to be a whole cloth quilt back.
In this tutorial, I show how to pattern-match perfectly when joining lengths of fabric together.
Making The Quilt Sandwich
Layer quilt top with batting and backing using your preferred quilt sandwich method.
Quilting Your Quilt
Quilt the quilt using your preferred quilting method.
I quilted in the seams using the Stitch In The Ditch quilting method from edge to edge of the quilt along all Block joining seams. I then quilted around the 3 square seams within each Block. I used a 4.0 mm straight stitch and Aurifil 50 wt #2600 Baby Dove Grey. NB: I have gone for looks over practicality, and this is not a recommended method with pressed open seams, see my Pressing Seams Pros & Cons Guide.
Squaring Your Quilt
Square the quilt using your preferred method.
I squared my quilt by ensuring the border all around the quilt measured 3-1/4" (right side facing) from the quilt edge to the border's seam with the main quilt top blocks. When a quilt is squared and has borders, such as for this quilt pattern, I advise my students instead of squaring up the whole quilt, they should ensure the border alone is equal in width at all points around the quilt. Visually, this will look correct to the eye even if the overall quilt measurements aren't perfectly equal and correct.
Binding Your Quilt
Bind the quilt using your preferred binding method.
The Materials list includes fabric for a 2-1/4" or 2-1/2" straight grain double-fold binding with a 10" excess included for finishing. I have used a 2-1/4" binding on the First Blush version.
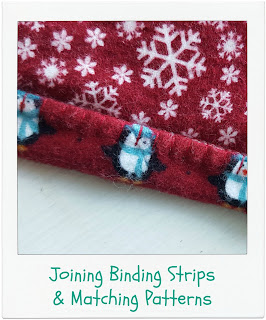
If you'd like to pattern-match your binding strips as you join them, I've created this Joining Binding Strips & Matching Patterns tutorial to show you how.
I've machine sewn the 2-1/4" double fold binding in place using a 4.0 mm straight stitch and Aurifil 40 wt #2423 Baby Pink.
The Finished Quilt
Captions for this pic of my photographic assistant 'worshipping' my work is welcome in the comments section ;D
Sharing Your Makes
I'd love to know if you make a Just One Block quilt using my pattern. You can share pics with me via the following links and hashtags #mbCD and #madebyChrissieD.
Just One Block Quilt Pattern
Clicking on an image will take you to a new page of crafty goodness :)
Disclosure:
Fabrics for the First Blush version of the Just One Block quilt were provided by Windham Fabrics, and fabrics for the Kukulcan Block were provided by Benartex Fabrics, both at no cost to mbCD. All other materials are my own. This post contains Amazon and Craftsy affiliate links for which I may be paid compensation on click-through purchases (at no additional cost to you). Otherwise, the post is for informational purposes only, and all opinions are my own.
Copyright:










Wow! What a great quilt and instructions Chrissie! Thank you so much for all the time you spent creating this for us.
ReplyDeleteFabulous quilt and great instructions Chrissie
ReplyDeleteThanks for this free pattern - must have taken you ages to write this post. I like the version where the middle square matches the outer border.
ReplyDeleteThanks Lesley, yes the tute do indeed take ages to put together! There are so many ways you can use these 3 blocks, singularly or in multiples. I've seen similar quilts where the square blocks are made using a different pattern design for each but making all 3 from this one pattern allows for simpler, faster fabric cutting and then more versatility in design choices. :D
DeleteVery nice and thanks for the pattern. It will be a great charity quilt.
ReplyDeleteBeautiful. Excellent pattern
ReplyDeleteYou give such easy instructions, I think I will use this to teach a friend how to make a quilt.
ReplyDeleteI love to share my quilting knowledge with my readers and students so your comment makes me particularly happy Donna. Keep in touch and let me know how you go on if you do use the quilt pattern to teach your friend - Chris :D
DeleteThank you for this pattern - wonderful instructions! Love your quilt!
ReplyDeleteI follow you on Bloglovin
ReplyDeleteThank you so much for the lovely pattern, and wonderfully detailed instructions. I'm going to try and make it! :)
ReplyDeleteDelighted you like the pattern Sharon, let me know how you go on with the pattern and I'd love to see pics too - Chris :D
DeleteAdorable pattern! Loving First Blush fabric!!!
ReplyDeleteI love your quilt-great pattern, thank you, Susan
ReplyDeletethis is lovely. i love the fabrics
ReplyDeleteSo lovely, might have to try this!
ReplyDeleteWow, modern pattern with 30's fabric! You made it work. Very detailed instructions are a joy!
ReplyDeleteI really appreciate your comment Susan, long blog posts aren't for everyone but I like to share here the same way I do in my classroom and I know some people enjoy step by step instructions and visuals while others are happy to work alone. This is the first time I've experimented by adding a link to a shortened version of my instructions within a blog post pattern, hopefully people will enjoy having both options - Chris :D
DeleteFollowing you on facebook now!!!
ReplyDeleteI would love to see this on a farmhouse white iron bed too! Or a picnic quilt!
ReplyDeleteI love all the additional layouts you posted. Thank you for the tutorial.
ReplyDeleteI would love to make a quilt with this gorgeous fabric. Thank you for the chance to win xox
ReplyDeleteLovely tutorial. I'll share your link with the club
ReplyDeleteYour quilt tuerned out so cute, and thanks for taking the time with the very helpful and detailed instructions!
ReplyDeleteYour quilt turned out beautiful and thank you for all the great tips with your tutorial.
ReplyDeleteI love the old fashioned look of your quilt. Your tutorial and tips are outstanding! Thank you.
ReplyDeleteYou provided great info in this blog! Thanks for the tutorial on matching the pattern when seaming.
ReplyDeleteThank you for this great tutorial !
ReplyDeleteLovely quilt- I will add it to my wish list! Thanks for sharing your pattern!
ReplyDeleteСпасибо большое за урок.
ReplyDeleteThanks for sharing this tutorial.
ReplyDeleteOh how pretty! I would love to learn to quilt one day. Thanks so much for sharing at #HomeMattersParty.
ReplyDeleteWow! What a detailed process. This is really terrific in every way. I appreciate that you took so much of your time to write this out as you have. Clearly a blog to subscribe to if you really are interested in learning how to quilt. I am very impressed. This quilt makes you want to have one like it. Looks cozy, too. Pretty.
ReplyDelete