Through Autumn's golden gown, we used to kick our way
You always loved this time of year
"Forever Autumn" by Wayne, Osborne, Vigrass
I haven't made anything using jelly rolls before, so I tried it. It's another quilting method to tick off my list! I made up the design as I went along, but it was so simple that I wanted to share my method with you here.
A Quick HST Method & Jelly Roll Quilt Tute
So here's my tute for a 50" x 72" finished jelly roll quilt.
I used approximately 40 x 44" x 2.5" strips (usually just one jelly roll, but check the number of strips included in whatever roll you're using).
The Technique
Sew strips together lengthwise in sets of 8 strips using a 1/4" seam.
Sew strips together lengthwise in sets of 8 strips using a 1/4" seam.
Iron the seams flat (to the side or open, whatever's your preference) and measure the width of the 8 joined strips. Using this width measurement, cut the 8-strip-wide fabric into perfect squares. You'll have sections left at the end of cutting that aren't large enough. Sew these together in any direction to make the fabric large enough to cut more squares of the required size so you can create more HSTs.
NB: In the photos below, I've used the same method but only 4 strips rather than 8 strips. Please don't let that confuse you!
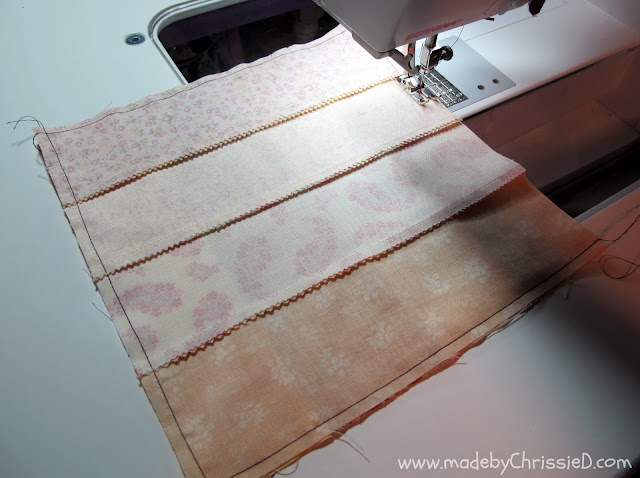
Place 2 fabric strip squares right sides together, varying the strips' direction with each set of 2 squares.
Here, I've placed the strips at right angles to each other.
Here's how to make super-fast Half-Square Triangles (HSTs): Sew around all four edges of the 2 layered squares using a 1/4" seam.
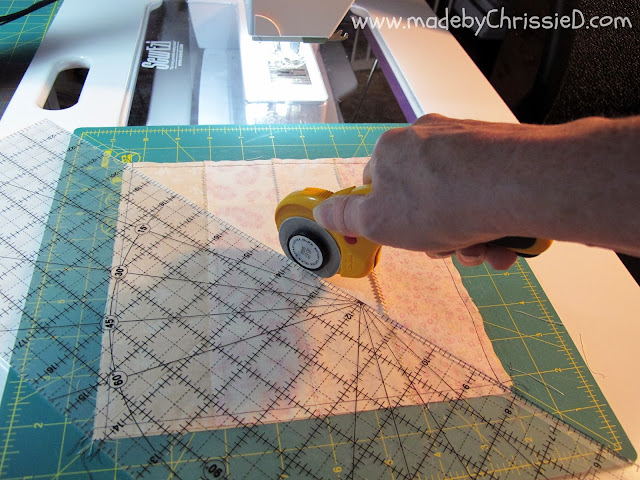
Now cut straight across both diagonals of the joined squares, creating 4 HSTs.
Cut through where the sewn lines cross rather than through the fabric corners.
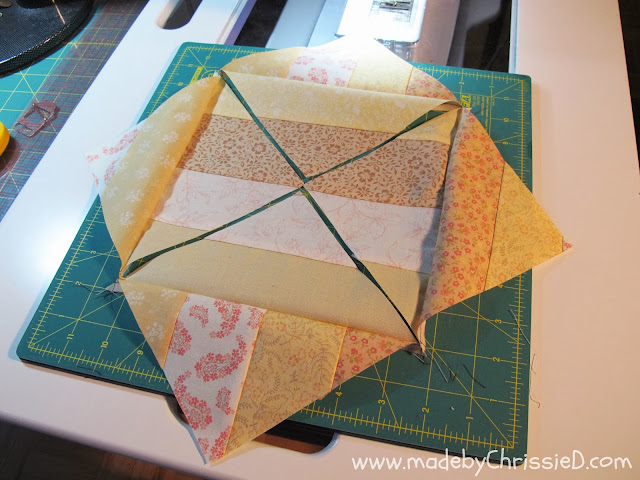
Turn the cutting mat, not the fabric, and cut across the opposite diagonal.
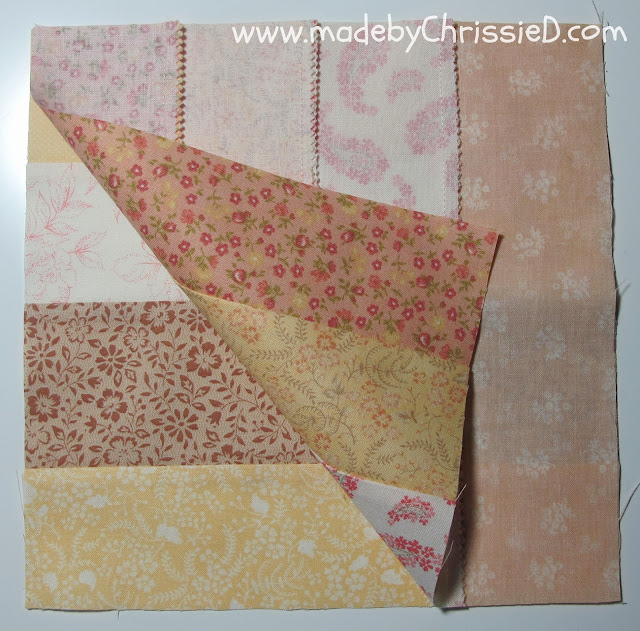
thus creating 4 HSTs
that open up into squares.
There are so many ways you can then place the HSTs to create different designs/layouts. Here are a few examples, but these will be different depending on the direction of the original 2 squares when you sew them together, and they will also vary when you start sewing together your leftover sections of fabric.
I played around with the layout, choosing my favourite placement for the HSTs. I then sewed them together in rows, which I then joined.
Then, I added a 3" border to the quilt top, creating a finished quilt that is 50" x 72".
The jelly roll fabric wasn't labelled, so I have no idea what the fabrics used in the quilt top are. I do know what the purple border fabric is, though. It's Padstow Range Cabbages & Roses Ltd, Floral Whitestone Lavender by Moda. The backing and binding are Philip Jacobs for Rowan, Cactus Dahlias PWPJ054—Gold.
I have quilted using a 1" wide vertical straight line. The top thread is Aurifil #2340—Cafe Au Lait, and the bottom is Aurifil #2255—Dark Red Orange.
Here's lots of finished pics taken on my roof garden:
I hope you've enjoyed the tute. If you use it, be sure to let me know. I'd love to see what you make with it. I'd also appreciate you dropping me an email if something isn't quite clear or if you spot any errors so I can improve the tute for everyone!
ANOTHER MADE BY ME...
Added 8 September 2015:

I made another version of the quilt as a sample for a class I teach - you can read about it here:

AND MADE BY YOU...
Added 8 February 2014:
Cleo Savala has made this fab version of the quilt - she contacted me via my Facebook page: "Wanted to share a photo of my take on your Autumn's Golden Gown. I just used the blocks from the HSTs and then used the rest as a pieced border. It was fun, fast and easy! Thanks.". Thanks to you, too, for sharing, Cleo; it's so wonderful to see a tute I've written made up by someone else, and your quilt is gorgeous :D
Added on 20 February 2014:
Last night at the Manhattan quilt store where I work, staffer and tutor Karen Moore Haynes was busy showing off her latest quilt top to students in her class, so I snapped a quick photo. Inspired by Cleo Savala's version of my Autumn's Golden Gown quilt that I shared earlier in February, isn't it just wonderful - made with a narrow jelly roll called a 'honey bun' - 1.5" strips instead of 2.5". I hope once Karen finishes the quilt, I'll be able to share that with you, too :D
Added on 15 May 2014:
Take a look at Karen Moore Haynes's finished quilt. She offset the above panel in a solid background with self-colour binding and diagonal quilting; it looks fantastic.
Cleo Savala has made another version of the quilt - she contacted me via my Facebook page: "Made another Jelly Roll quilt for my sister who's in the hospital recovering". Another fab finish, Cleo; thanks so much for sharing, and we send our best wishes to your sister for a speedy recovery :D
Dorothy Calvani, a student from one of my classes, sent me this picture of her finished Jelly Roll quilt. Dorothy spent time considering the finished design rather than using a random technique, she has created some strong points and staggered continuing lines across the blocks. She used a pillow turn technique to finish her quilt, making this a super fast, easy quilt finish; thanks so much for sharing the pic, Dorothy. I love how this turned out so much :D If you'd like to try the pillow turn technique for yourself, I have a tute for it here - you may be surprised, but my fabric coasters are made precisely the same way, on a much smaller scale!
Another student, Susan, from my Jelly Roll Quilt class brought her quilt top along to our May 2016 NYC Metro MOD Quilt Guild meeting so I could take this pic of her with it. Gorgeous colours, Susan, I love it :D
A Quick HST Method & Jelly Roll Quilt Tute
Featured on:


Clicking on an image will take you to a new page of crafty goodness :)
Disclosure:
This post contains Amazon and Craftsy affiliate links for which I am paid compensation on click-through purchases (at no additional cost to you). Otherwise, the post is for informational purposes only; all opinions are mine.
Copyright:


I love your technique and the finished quilt is beautiful! Thank you so much for sharing!
ReplyDeleteJulie @ The Crafty Quilter
Thanks to you too Julie for featuring this quilt on your blog's Sew Thankful Sunday post this week, that was a lovely surprise :D
DeleteThis is an easy to understand tutorial! The result is, as with all your work, just beautiful!
ReplyDeleteThanks so much Queenie, I always appreciate your opinion and comments :D
DeleteExelente tutorial!
ReplyDeleteWow the quilt looks amazing
ReplyDeleteA beautiful quilt to be sure. I really love the backing that you chose to use. My kind of fabric! A great finish.
ReplyDeleteI can't wait to try it. Thanks for the tutorial.
ReplyDeleteIf you do try it Emilie do let me know, it would be great to see how it turns out, have fun :D
DeleteThat's really pretty! The background/view is pretty amazing too!
ReplyDeleteLovely quilt Chrissie, the perfect excuse to buy a Jelly Roll!
ReplyDeleteWhat a gorgeous quilt and a fab tutorial. Who new making all those HSTs was so easy - such a simple method and yet to the untrained eye it looks so complex a pattern. I've never used a jell roll either but I'd love to have a go for a 'quick' quilt. I'm going to have to give this one a go at some stage. Thank you so much for sharing xx
ReplyDeleteIt's really fast Sarah - didn't even trim the HSTs - they cut through so evenly there's really no need and that saves sooo much work. There's so many fantastic jelly rolls out there it's a great excuse to buy one! :D x
DeleteWhat a beautiful quilt and tutorial Chrissie and your photos.....as always awesome!
ReplyDeleteThanks for sharing.
Freemotion by the River Linky Party Tuesday
Great idea, made one similar but the eight strips would make blocks so much larger. Must ask where did you have your labels made? Love those.
ReplyDeleteThanks Diane - with the 8 strips it's such a quick make. I'll email you about my labels :)
DeleteGreat job with the tutorial, Chrissie! Beautiful quilt!
ReplyDeleteHi Chrissie!!
ReplyDeleteWhat a wonderful quilt! I admire you!!
And I love the views of THE CITY!!
Thanks for following!!
Hugs from Spain!
Ingrid
this looks FABULOUS!!!
ReplyDeleteThis is just lovely and the tutorial is very well done and easy for me to follow. Perfection, and, the backing fabric is so Autumnal, I love it, too!
ReplyDeleteLovely low volume quilt - and the border, binding and backing are perfect! Thanks for sharing the tutorial.
ReplyDeleteNice tutorial - thanks for taking that time. (The 4-8 strip thing wasn't confusing at all since you pointed it out.) And what a pretty quilt - that backing is gorgeous.
ReplyDeleteThanks Lyn and it's good to hear that the 4-8 strip change isn't confusing, I was nervous about making the change. I took some of the photos after making the quilt once I realised it would be a really good tute to share just by adding a few extra photos and I only had those 4 pieces of fabric left - hence the change in the strip numbers. :D
DeleteWow, this quilt is just lovely. Not colours that I would naturally select, but you've used them so well together! Great tutorial too :) thanks for linking up :)
ReplyDeleteThanks Gemma, funny you should say the colours aren't what you'd choose, that's how it is for me too. The quilt is a gift for someone and the top colours are very much their palette rather than mine - the backing was my way of adding a little bit of something more me into the project too!!! :D
DeleteThis quilt is so pretty. I really like the block idea and your tut is great. Very clear. Thanks for sharing it.
ReplyDeleteGreat tutorial! Can't wait to try it.
ReplyDeleteThanks Kim, if you do use the tute let me know how you go on, I'd love to see how it works for others :D
DeleteI have never used a jelly roll-looks like I need to. Thanks for the great tutorial!
ReplyDeleteSpectacular quilt.Design,fabrics ,quilting and tutorial is fabulous.Thanks you for sharing!!
ReplyDeletefab tutorial Chrissie, thanks for sharing!
ReplyDeleteAwesome. Thanks for sharing.
ReplyDeleteBeautiful! and I appreciate the tutorial. The backing is awesome too. Thank you.
ReplyDeleteLovely quilt! You did a fantastic job, thanks for the tutorial!
ReplyDeleteOh Chrissie! I love this quilt. The colors are so peaceful and happy and your pics are sooo good. Love it!
ReplyDeleteLovely quilt! And the colors on the backing are so vibrant!
ReplyDeletePS - I love the rooftop garden! What a great view!
I chose the backing fabric because it seemed to me that it was all the colours in the quilt top but with so much more depth and saturation - I feel like it grounds and gives weight to what could otherwise have been quite a light, and insignificant quilt. PS - I love my rooftop garden and view too! :D
DeleteGreat tutorial! Thank you for sharing!
ReplyDeleteBeautiful quilt and great tutorial- well done, very clear instructions. Great photography too! Awesome view of Manhattan!
ReplyDeleteBeautiful quilt! Nice tutorial! Love your view! I have many jelly rolls and now need to get busy!
ReplyDeleteBeautiful - love that backing fabric! Thanks for the tutorial! I've never bought a jellyroll - but it could be in my future!
ReplyDeleteThis quilt is absolutely gorgeous!!! I will be pinning this and adding it to my wish list of quilts I'm dying to make. I'm really hoping the next baby we have is a girl (in the future), and this style would make a darling baby girl quilt. Thanks for sharing!
ReplyDeleteWow, that's wonderful to hear, if you do make the quilt in the future be sure to let me know how it turns out, let's hope for a girl so we both won't have to wait too long to see the quilt! ;D
DeleteA beautiful quilt, Chrissie!!! Thanks for the tutorial... I've pinned.
ReplyDeleteThanks Amy, I think this HST method makes the most even blocks ever. I've made HSTs several ways and I'm a huge fan of Bloc-locs but this method doesn't even need any trimming and that's a huge bonus!!! :)
ReplyDeleteLovely quilt. I have a Liberty jelly roll which I can't seem to get on with. I don't feel that the fabrics worth together in strips. They just seem disparate together when I lay them out. (The original quilt is just strips quilted in 1" intervals.) I have made the method you show here, but my Liberty strips are not all the same width. However, I like the idea of blocks going alternative ways May try it. Love you other quilts too,. Thanks for the inspiration.
ReplyDeleteSo pleased you've visited my blog and hope that you can use the method here to good effect with your Liberty strips. I'd love to see how you go on :D
DeleteThanks so much. This is the real deal. I have a jelly roll somewhere. :) It still is quicker than the old fashioned way of cutting out each piece separately and sewing them separately. I'm featuring you this week. Linda Pinning also.
ReplyDeleteThanks Linda - I've given your blog and my feature a shout out on my facebook page. :D
DeleteI love this tutorial! There are so many neat variations with the blocks and so much movement in the pattern!
ReplyDeleteThank you so much for linking up to Needle and Thread Thursday!
:) Kelly @ My Quilt Infatuation
So beautiful! And such a good tutorial!! I love the Fall colors. Thanks for linking!
ReplyDeleteThanks for this! I used this as the basis for a quilt I just finished. I'd love to share a photo of mine with you let me know how I can get it to you.
ReplyDeleteActually just found you on Facebook sent it to you
DeleteI'm so glad you shared your quilt with us Cleo and in turn you've inspired others - my CQ workmate Karen has now made her own version having seen your colourway :D
DeleteLove it! Actually need to tell you about the small world we live in. I guess I really didn't know much about you and was lucky that someone had pinned you tute! After I shared and found your blog and all I made the connection to CQ. My daughter traveled to NYC for work and one of her must go to and first stops was CQ!
DeleteOh I wonder what day she came in and if I met her? Next time she's here Cleo, she must say "hi" :D
DeleteFinally got mine quilted, now to get it bound.
DeleteSo this tute will go on my to do list when I am all stressed out over what to make next! I have a jelly roll waiting! Love it!
ReplyDeleteChrissie THANK YOU for rejuniating this past post under our TUesday ARchives Jelly ROll theme....it's the perfect pattern for a "roll" I have. I'll be sure to link back to your tutorial when I make it....as I'm definietly going to use it! With smiles. V
ReplyDeleteThis is such a great low-volume quilt. So sweet. www.quiltartbymegan.com
ReplyDeleteYou copied the 3 Dudes Pattern. Nice tutorial but come up with your own ideas.
ReplyDeleteDear Anonymous, I have no other way of contacting you given your Anonymous status so I'll reply to your comment here. Thanks for taking the time to look at my tutorial and leave a comment, unfortunately you are incorrect in your statement and to alleviate your concerns I can confirm I have never heard of the 3 Dudes or seen the 3 Dudes Pattern so it is impossible that I have copied their work. The method I've used to make HSTs for my quilt is well known and has been used for many years by numerous quilters. As a quilting teacher I chose to share my knowledge of this method here on my blog as I would willingly share it with a friend at home or student in class. I have not claimed ownership of the method or supplied it here as a pattern, this post is merely a quilting technique tutorial and the final HST layout and optional addition of borders is ultimately decided by the individual. If my own chosen design layout for my Autumn's Golden Gown quilt in any way echoes the 3 Dudes Pattern then, to apply that well known movie statement, "Resemblance, if any, is purely coincidental.". Have a great week - Chris :D
DeleteWhat a hateful thing to say. You can't say something nice, don't say anything at all. And of course you're so brave you replied anonymously! Chris I love your work and wanted to say it again!! Thank you!
ReplyDeleteThanks for your support Cleo. It's funny I don't think 'Anonymous' commenters realise they're not all that anonymous. The owner of any blog has full and free access to information about everyone who visits their blog that falls just shy of giving you their actual name and house number! I wrote a post about it fairly recently in response to another comment from 'Anonymous'! If a blogger's ability to find anonymous commenters was better publicised maybe people would check their facts or think twice before leaving incorrect or nasty comments, though I suspect sadly even this wouldn't stop the nastiest of commenters. Hope you have a great week lined up, I know I do - Chris :D
DeleteThanks Chris! I need to get myself motivated and get back on track. UFO stack is growing again. Happy quilting and in your case this week travels!
Delete(L) My favourite!
ReplyDeleteHere's where I meant to comment. I made another Jelly Roll quilt I sent you pictures via Facebook message.
ReplyDeleteThank you so much for sharing your work. What lovely quilts. I think I will follow your Autumn Colour Jelly Roll Quilt as my next project.
ReplyDeleteI enjoy making these types of quilts, especially when one can play with the arrangement.
ReplyDeleteWhat size quilt does one jelly roll make? (Without the border.)
ReplyDeleteHi Melody, without borders my quilt top would measure 44" x 66". The final measurement would be different for each quilt top depending on how many strips and the length of each strip in the jelly roll and then on how many squares you cut from the made fabric and what size you cut the squares out at.
DeleteWhen I teach this as a class I recommend students make up one jelly roll of strips and then add borders to reach the finished size they're looking for, I've only had one student make the quilt top using 2 jelly rolls and that quilt was enormous when she finished! Hope this helps - Chris :D
Love the color!
ReplyDeleteLOVE your technique! I will definitely have to try this one. What are the chances of finding the Dahlia Cactus fabric?
ReplyDelete