

It's December, and it's my month to be Queen Bee for my NYC Metro Mod Guild Bee.
I want to keep it simple because December is such a busy month for everyone so, although my choice for the month involves making 5 blocks, there're only 4 fabric cuts and 20 straight sewn lines!
Then while I was putting together the tute for my Hive Bees it occurred to me it would be good to share it with my readers too - so here's my tute to make a Sliced Improv Block.
Then while I was putting together the tute for my Hive Bees it occurred to me it would be good to share it with my readers too - so here's my tute to make a Sliced Improv Block.

A Sliced Improv Block Tute
To make 5 blocks you'll need 5 fabric squares, you can adapt the block to use any size squares you like - so this would be a great block to use up a layer cake. In the packs I'm sending out to my Bees I include 5 x 10" fabric squares per person.

Take 1 block and mark 2.5 inches from the end on each edge.

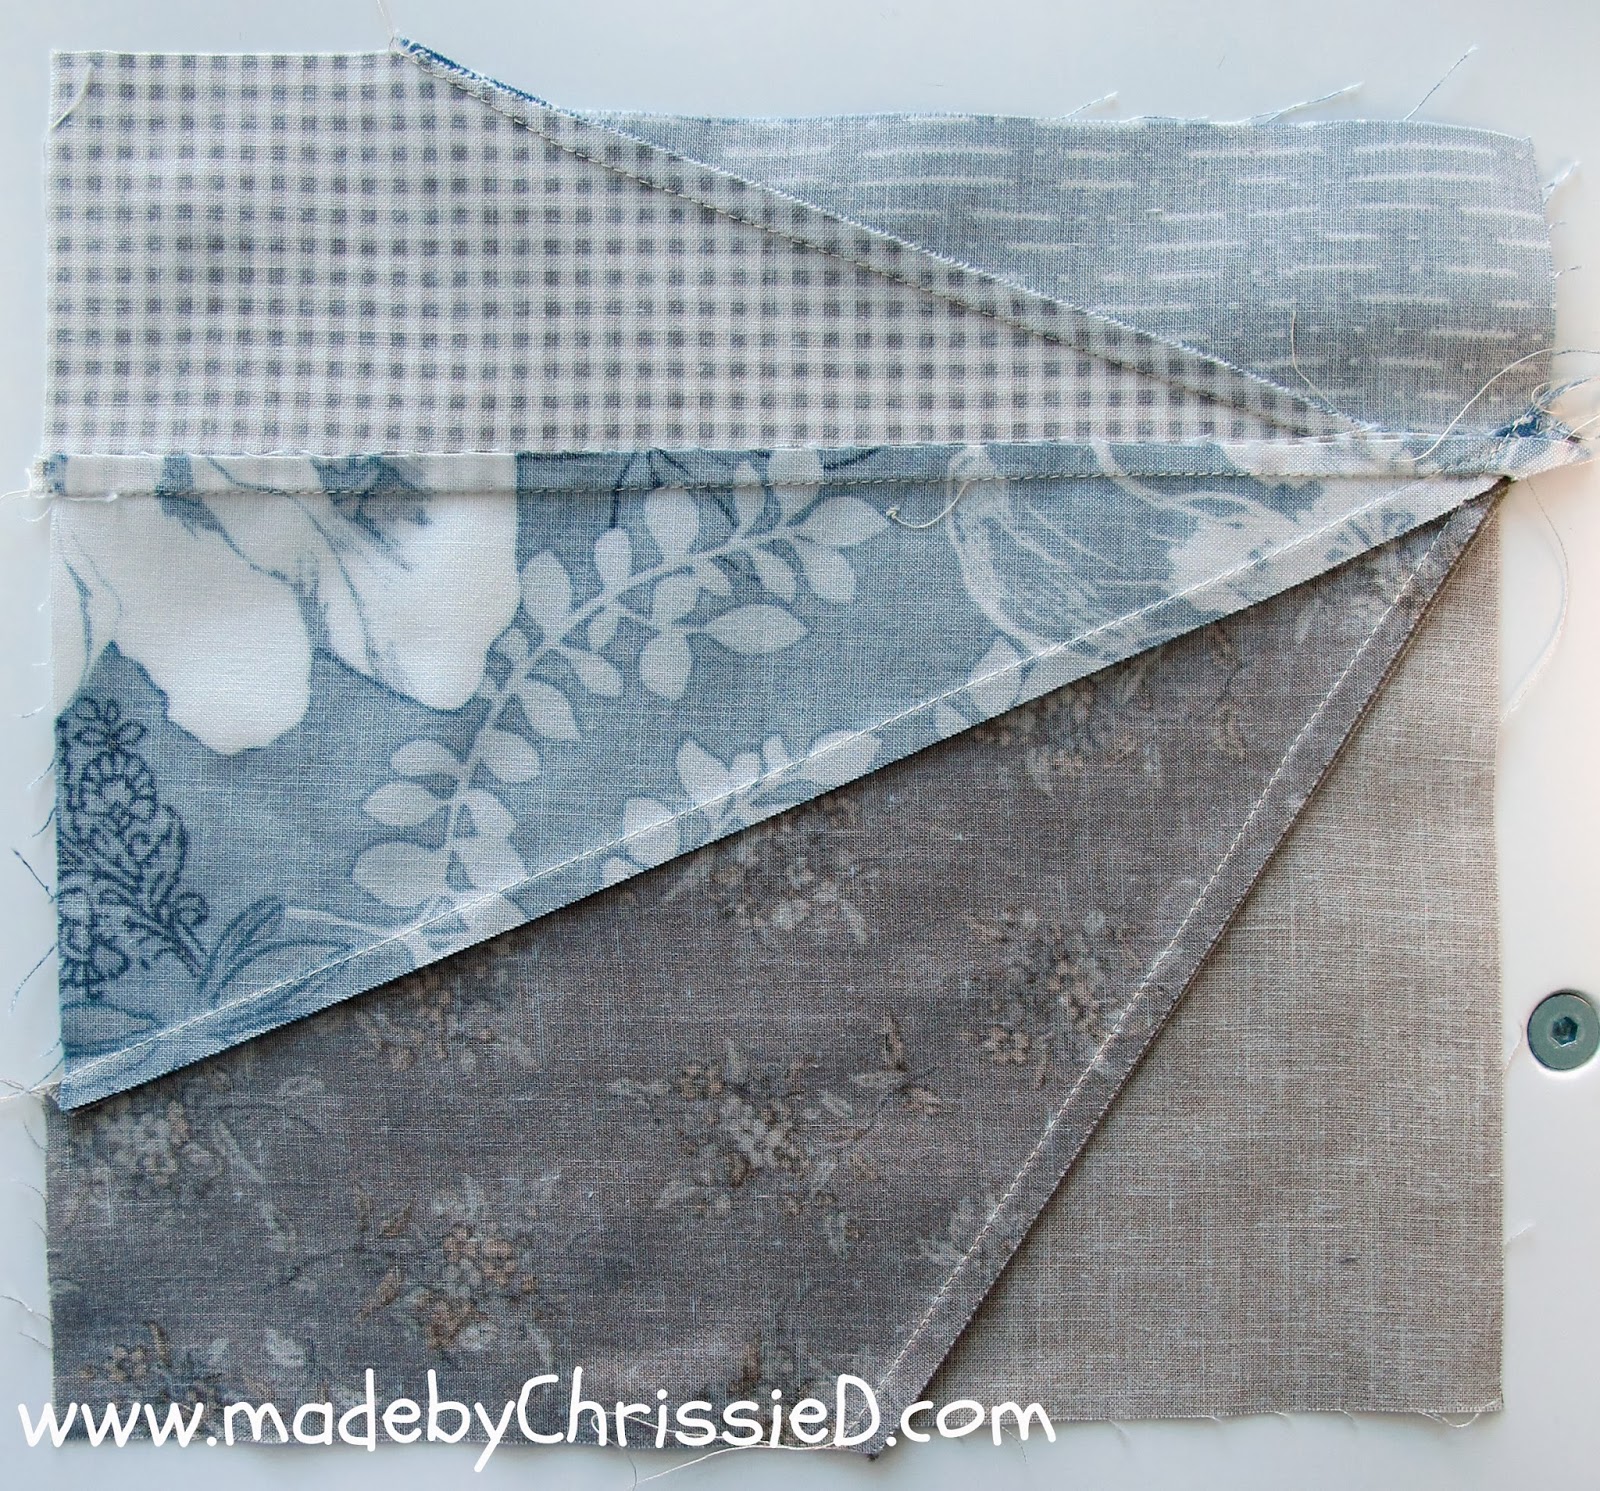
Place your long ruler on the left-hand edge of the marked block at any point between the two 2.5" markers (going closer to the edges will create pieces that are small, difficult to sew together and look lost in the final block) and draw a line across to any point between the two 2.5" markers on the top edge of the block.

Go back to your starting point on the left edge and mark out two more lines, this time, over to the right-hand edge of the block - again stay within the 2.5" margins on either end of the right-hand edge.

Now go back to your starting point on the left-hand edge and mark a point to the bottom edge of the block - (remember your 2.5" margins).

Make a 'perfect' pile of the 5 blocks (well as 'perfect' as you can!) and place the marked out block on top of the pile.

Take your ruler and cut through all 5 blocks on your 4 marked lines to create 5 triangular sections on each block, each cut identically to the block above it.


Take 1 different piece from each block to create 5 blocks with a slice of each fabric.

Sew the pieces of each block together using a 1/4" seam. The fabric is cut on the bias so try not to stretch it as you work.

These pieces aren't the easiest to line up but pressing each seam as you sew makes the process easier.


The finished block can be quite uneven at the edges, but there should be enough play in the fabric to allow you to trim the blocks down (in the case of my 10" fabric I can trim them to approx 8.5" squares). (Reminder note to my fellow Bees - please don't trim the blocks just send them back to me as they are :D)

And here are my 5 trimmed blocks.

I'm looking forward to playing around with the blocks when I get them all back and deciding on a layout for them, they're such versatile blocks. Just by changing the direction of the blocks here are 4 different design example layouts.


I'll be receiving 5 completed blocks from 11 Bees, and then there're my 5 blocks as well so I'll have 60 x 8.5" blocks. I'm thinking an 8 x 7 block quilt possibly with sashing (56 blocks) and maybe I'll incorporate the last 4 blocks into the backing or make a cushion cover.
All the fabrics I'm using are in the blue/grey/beige/brown colour palette - this will be another quilt for my lounge to sit alongside my Juice Box Sofa Quilt that you can see in my Blog Header photo, and I wrote about that quilt here too.

I'll be sure to update you with another post once I make the quilt :D
Featured on:

Featured on:
Clicking on an image will take you to a new page of crafty goodness :)


Disclosure:
This post contains Amazon and Craftsy affiliate links for which I am paid compensation on click-through purchases (at no additional cost to you). Otherwise, the post is for informational purposes only, and all opinions are my own.
Copyright:


Thanks for sharing, love this!
ReplyDeleteGreat Bee block, your Bee mates will have fun with this Chrissie.
ReplyDeleteLove your color way. Great explanation and photos…
ReplyDeleteA great tutorial...your blocks are very lovely and the colors are a great combo for this block.
ReplyDeleteThank you so much for the informative tut! Your new quilt will be beautiful.
ReplyDeleteReally great tutorial, with so many interesting possibilities! I really, really like that color palette - so soothing.
ReplyDeleteLove the tutorial ~ and those blocks are so fun! Can't wait to try this one :)
ReplyDeleteWanting to cuddle with the puppy and quilt...I love your color palette! Beautiful for the Winter season!
ReplyDeleteShe's just the sweetest pup Dee and a huge quilt fan!!! :D
DeleteLovely! Thanks for sharing the tutorial.
ReplyDeleteWhat a great tutorial and even better I just love the quilt. Those colors go so well together. Beautiful Job. Thank you for sharing with the Clever Chicks Blog Hop! I hope you’ll join us again next week!
ReplyDeleteCheers,
Kathy Shea Mormino
The Chicken Chick
http://www.The-Chicken-Chick.com
Thanks for the fun tutorial. I will be trying this out!
ReplyDeleteOh, you come up with the best ideas! Well done!
ReplyDeletevery cool tutorial! i like all of the layout options.
ReplyDeletethose are gorgeous and look totally doable!
ReplyDeleteStopping by from Lee's hop
http://domesticdeficitdisorder.blogspot.com/2013/12/wip-wednesday-dec-4th.html
Improv blocks are another one of those things I've never tried that are certainly on my "to try" list. Seems that list is never ending. I'll have to pin this to make sure I come back to try it cause you're directions are just wonderful!
ReplyDeleteLove the colors you used! Lots of fun layouts too.
ReplyDeleteGreat block. This is gives so many possibilies in layout!
ReplyDeletethese are great blocks, and the layout does change the look dramatically. Awesome!
ReplyDeleteThank you so much for sharing at Needle and Thread Thursday!
:) Kelly @ My Quilt Infatuation
Cool block!
ReplyDeleteVery nice Tutorial! I bet you get some great blocks in the swap.
ReplyDeleteThanks for a great tutorial!
ReplyDeleteWhat a great block and tutorial Chrissie!! That type of block is always so much fun to make!! Beautiful colors too! Thanks for sharing.
ReplyDeleteFreemotion by the River Linky Party Tuesday
I like the first layout best but it would be interesting to see all of them on a design board. Good luck with the quilt, it looks like fun.
ReplyDeleteRight now the first layout is my favourite too but as you say it'll be interesting to see it on the design board so I'm excited to get all the blocks back :D
DeleteNeat! I've done crazy quilts but for some reason it never dawned on me to slice it other ways. I'll need to try that out!
ReplyDeleteOh, I love this tutorial. I will have to try it myself and SOON!
ReplyDeleteWhat a well laid out tutorial for a fabulous block! There are so many possible looks depending on the layout. And your pics are great! Thanks for sharing, Chrissie!
ReplyDeleteI love your fabrics and this approach. I am hoping to do some "improve" or "free" piecing this year, and this is just the kind of thing I think I'd enjoy. There are clear rules to follow with plenty of room for things to get a little "wonky."
ReplyDeleteI'm working on a quilt right now with these blocks (although mine are a bit bigger - they finish at 15.5")!
ReplyDeleteKim
http://tiesthatbindquilting.wordpress.com/
I've just seen your finished quilt Kim, looks great and hope your sister loves it. I read your posts and see that you, like me, found that when you make blocks this way they just don't come out square and need to be cut back after the pieces are joined - everyone in my Bee has found exactly the same thing too. I haven't worried about it, I'm just going to cut all the blocks down to the lowest common size when I get them all back. I checked out your link to Melissa's Refracted tute which uses the same method as mine and she doesn't mention this as being an issue for her, would love to know how she's managed that!!! :D
DeleteSome of those layouts are just awesome! Thanks for the inspiration.
ReplyDeleteI can't wait to get all my blocks back from the other Bees, I'm excited to put it together. I have to keep resisting working with the blocks I have already received, I need to wait until I have everything back so the prints will be throughout the layout and not the same 5 prints left for the top row only! :D
Delete