teaching sewing confidence, tip by tip
Showing posts with label Juicebox Quilt. Show all posts

Friday, 29 November 2013

How To Make A Sliced Improv Block - My NYC Metro Mod Guild December Bee Block Tute


It's December, and it's my month to be Queen Bee for my NYC Metro Mod Guild Bee.

I want to keep it simple because December is such a busy month for everyone so, although my choice for the month involves making 5 blocks, there're only 4 fabric cuts and 20 straight sewn lines!

Then while I was putting together the tute for my Hive Bees it occurred to me it would be good to share it with my readers too - so here's my tute to make a Sliced Improv Block.


A Sliced Improv Block Tute

To make 5 blocks you'll need 5 fabric squares, you can adapt the block to use any size squares you like - so this would be a great block to use up a layer cake.  In the packs I'm sending out to my Bees I include 5 x 10" fabric squares per person.

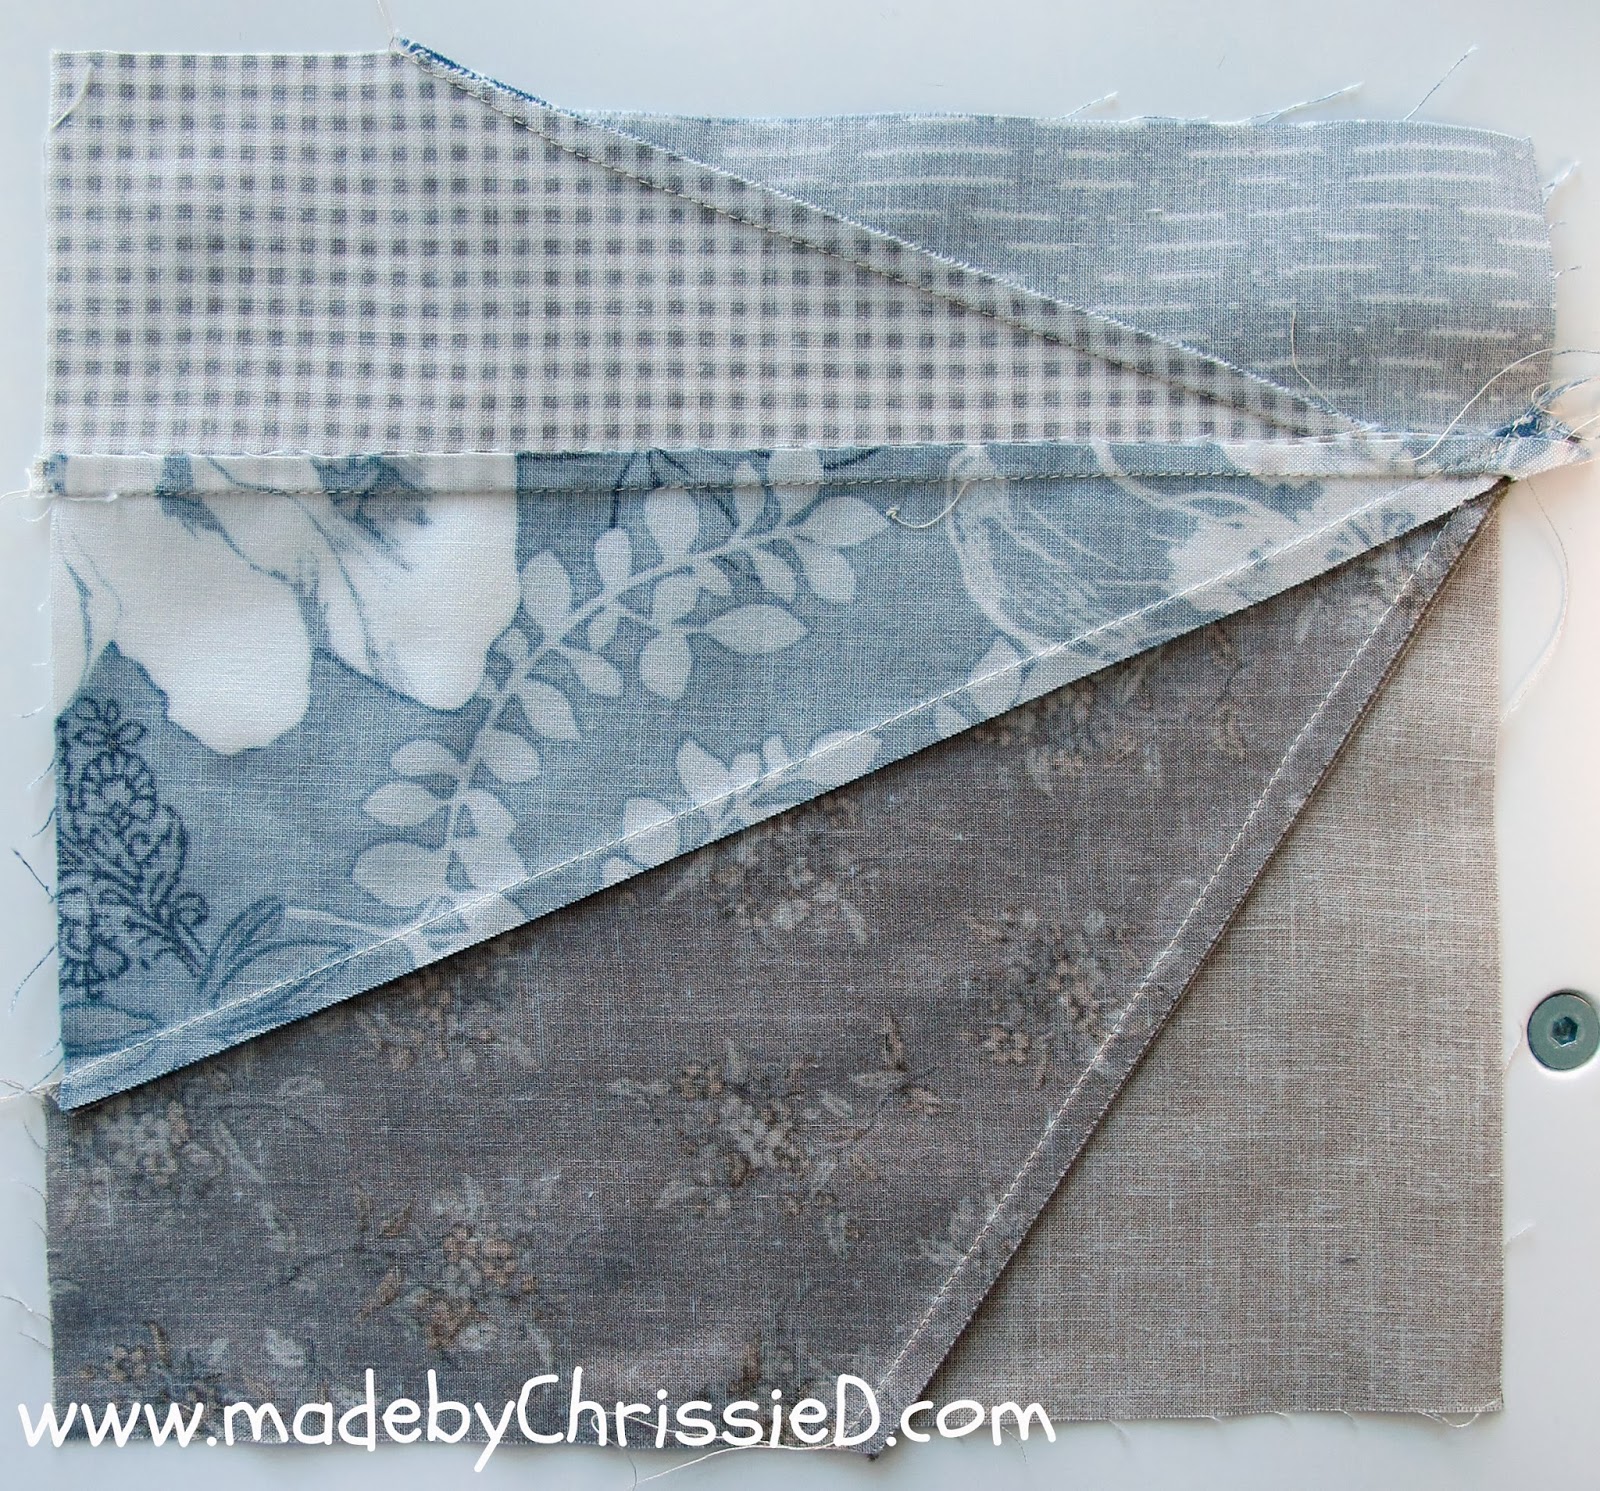
Take 1 block and mark 2.5 inches from the end on each edge.

Place your long ruler on the left-hand edge of the marked block at any point between the two 2.5" markers (going closer to the edges will create pieces that are small, difficult to sew together and look lost in the final block) and draw a line across to any point between the two 2.5" markers on the top edge of the block.

Go back to your starting point on the left edge and mark out two more lines, this time, over to the right-hand edge of the block - again stay within the 2.5" margins on either end of the right-hand edge.

Now go back to your starting point on the left-hand edge and mark a point to the bottom edge of the block - (remember your 2.5" margins).

Make a 'perfect' pile of the 5 blocks (well as 'perfect' as you can!) and place the marked out block on top of the pile.

Take your ruler and cut through all 5 blocks on your 4 marked lines to create 5 triangular sections on each block, each cut identically to the block above it.

Take 1 different piece from each block to create 5 blocks with a slice of each fabric.

Sew the pieces of each block together using a 1/4" seam.  The fabric is cut on the bias so try not to stretch it as you work.

These pieces aren't the easiest to line up but pressing each seam as you sew makes the process easier.


The finished block can be quite uneven at the edges, but there should be enough play in the fabric to allow you to trim the blocks down (in the case of my 10" fabric I can trim them to approx 8.5" squares). (Reminder note to my fellow Bees - please don't trim the blocks just send them back to me as they are :D)

And here are my 5 trimmed blocks.

I'm looking forward to playing around with the blocks when I get them all back and deciding on a layout for them, they're such versatile blocks.  Just by changing the direction of the blocks here are 4 different design example layouts.

I'll be receiving 5 completed blocks from 11 Bees, and then there're my 5 blocks as well so I'll have 60 x 8.5" blocks.  I'm thinking an 8 x 7 block quilt possibly with sashing (56 blocks) and maybe I'll incorporate the last 4 blocks into the backing or make a cushion cover.

All the fabrics I'm using are in the blue/grey/beige/brown colour palette - this will be another quilt for my lounge to sit alongside my Juice Box Sofa Quilt that you can see in my Blog Header photo, and I wrote about that quilt here too.  


I'll be sure to update you with another post once I make the quilt :D


Featured on:


Clicking on an image will take you to a new page of crafty goodness :)

Disclosure: 
This post contains Amazon and Craftsy affiliate links for which I am paid compensation on click-through purchases (at no additional cost to you). Otherwise, the post is for informational purposes only, and all opinions are my own.

Copyright: 
Uncredited reproduction of all content, text and images on this site is prohibited.
All content, text and images must be credited to Chris Dodsley @made by ChrissieD and include a link back to this site.

Protected by Copyscape


Craftsy Unlimited FREE 7 day trial at Craftsy.com

Sunday, 18 November 2012

Not So Finished Edges, Yet!

Next week I'm doing a 2 part course at my LQS in Manhattan with the wonder teacher and quilter Christine Janove.


FINISHED EDGES
Concentrate on the fundamentals of how to make & attach straight grain & bias binding. 
Practice is done on small quilts or place mats that you bring to class. 
However, the edges of your quilt can be finished in more ways than just these two. 
There will be discussion & demos of facing, mock binding & more. 
Learn which to use for the best results.


So the class supply list arrived and I need to take along 4 quilted pieces approx 14" x 18" that can become place mats or muslin samples. I didn't need telling twice, I spent all day Saturday busy at the cutting mat and machine and here's the results.

Cut strips and a finished quilt top
I raided my scraps bag and used all the same fabrics that I used for my Juicebox Sofa Quilt which lives in my lounge.
I figured that if the quilt looks good in here then the place mats should look the same way.


I used the same fabrics in each place mat but in different colour/print order each time.
All 4 place mats are backed with Dear Stella - Doodle Paisley - Grey.


So they're all ready now for my class and I'll be binding them in a very dark midnight blue solid.
I'll share more photos with you when they're finished.


Follow on Bloglovin


Saturday, 10 November 2012

What's For Breakfast? Mondrian and Ikat Of Course

Instead of eating breakfast this morning all I wanted to do was make my November Bee Blocks - remember I shared the fabric and instructions with you yesterday?

So that's exactly what I did and here's the results

the block on the left is 16.5" x 16.5" and the block on the right is 15.25" x 13.5"
In the end I changed my design for the right hand block so I could make a larger block and use more of the fabric I'd been sent.


While I was busy sewing, Simon picked up some pain au chocolat for us and Flicky's house guests - which were far more scrummy than the healthy breakfast option I'd have made for myself.  While all this was going on Tatty busily wrapped herself up in my Juicebox Sofa Quilt - I just love my dog xxx


Related Posts:
Ikat and Mondrian - My November Bee Block 


And you can click this link to see all of my NYC Mod Quilt Guild Bee Blocks and Challenge Blocks/Quilts.


Follow on Bloglovin


Sunday, 16 September 2012

Juice Box Sofa Quilt

Time to share another quilt that I made before my blogging days began.


This is my Juice Box Sofa Quilt based on the Juice Boxes design by Cluck Cluck Sew


I made the quilt as part of a class taught by Karen Haynes at my LQS in Manhattan and that's when she introduced me to the June Tailor Shape Cut Plus ruler (I know I say this over and over but if you haven't checked out my tutorial for this then please give it a go - it really is a must-have tool for any quilter :) )


I decided to sash the quilt to make it larger and I think that and the neutral colourway have given it a very different feel to the original quilt pattern which is more suited to being a child's quilt.  My sashing is 2" finished so 2.5" strip cuts - other than adding the sashing my quilt is made exactly following the pattern sizes given.


Here are some extra photos that I've found that I took during the piecing process.


And some detail shots of the quilt - these are taken indoors so you can see the colours much better without the strong sunlight.


And finally, here's Thatcher (known as Tatty to her friends) - as you can see, she LOVES the quilt!


Quilt Size:
Finished quilt size 72" x 56"

Fabrics Used:
Top Sheet - when I made this quilt I wasn't at that time paying any attention to who designed the fabrics or even what they were called and I've used so many in it that, apart from the backing fabric, I can't list them for you.
Backing Sheet - the main fabric is Dear Stella - Doodle Paisley - Grey.


Clicking on an image will take you to a new page of crafty goodness :)
 

Disclaimer:
This post is for informational purposes only, no payment or commission is received on click-throughs and opinions are my own.

Click to follow me on