So I need to cut a large number of charm squares for a quilt top I'm making for a course at The City Quilter, Manhattan next Thursday.
Could be quite a task but I do have a fantastic piece of kit that I'm going to share with you -
June Tailor's Shape Cut Plus Ruler. I was introduced to this gadget by Karen Haynes, a tutor at CQ. Using the
Shape Cut Plus should make very light work of cutting up the fabric. The ruler is 12" x 18" with vertical slots for cutting guidelines every 1/2".
And here's how I did it - the fabric colours aren't the best to show up against the colour of the cutting mat so I hope you can all see it properly.
I need 72 accent squares - 24 from each of the 3 coloured fabrics and then I need a further 72 squares from my main fabric. Each of the three accent fabrics is 42" wide so I can get 8x 5" squares from each width (40") and I'll need 3x 5" cut widths to create 24 squares.
Iron the fabric and fold it in half lining up the selvedge dots so the selvedges from both edges can be removed in one cut.
Fold the fabric in half up to selvedge edge again
Lay the fabric on the cutting mat and place the
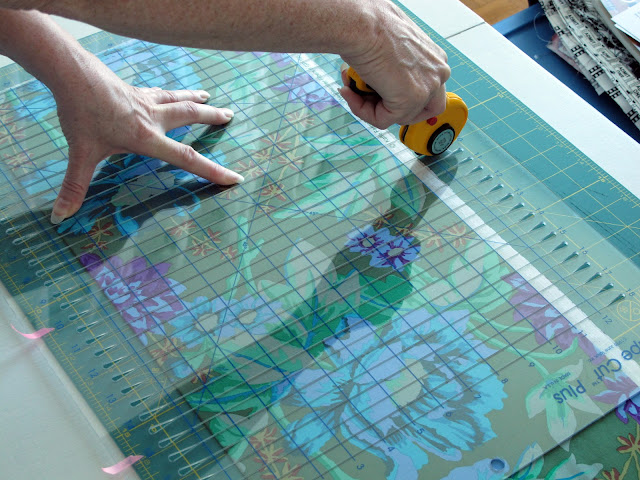
Shape Cut Plus over it lining up the blue '0' horizontal line parallel with the folded edge of the fabric - at the same time line up the vertical '0' with the raw fabric edge, making sure that when you cut this edge any unevenness will be cut away to leave a straight edge line on the fabric.
As I want 3x 5" strips I have marked the
Shape Cut Plus with pink tape at the 0/5/10/15" slot lines so I can use these as my guide and know I'm cutting through the fabric at the right place - this takes all the anxiety out of cutting!
If you are right-handed place your left hand on the
Shape Cut Plus to hold it in place on the fabric - though I have to say it stays in place really well anyway (if you're left-handed work from the opposite side). Place your rotary cutter into the slot guidelines of the
Shape Cut Plus, start closest to your body and slice away from you through the fabric at the 0/5/10/15" markers.
I've moved the fabrics apart a little so you can see how I've done the cuts - takes seconds, amazing!
Now you can remove the edge cuttings and the remainder of fabric that you won't be using.
There're two ways to do the next cuts and which you chose depends on if you want to save another few seconds of cutting time and have 2 scrap pieces left over or would you prefer to have 1 larger scrap piece left from your cutting. Anyway, here's the two methods and you can decide what works best for you.
 |
| left column - quicker method/centre & right column - larger scrap method |
Larger scrap piece - At 5" widths you can only cut the next stage 2 strips at a time. Unfold each strip of fabric so it is now folded in half instead of quarters.
Turn the
Shape Cut Plus around 90 degrees and place it back on the fabric being sure to again line up the '0' cutting line with your selvedge edge length line and the '0' blue horizontal line with the edge of the fabric width.
Cut the 0/5/10/15" line through the 2 strips of fabric and then move the final section of each strip along and cut another 5" square from that.
Repeat with the 3rd fabric strip.
Slightly quicker method with smaller scrap piece - You can leave the fabric folded into quarters and cut the 90-degree cuts from there at 0/5/10" in the same way as above but this way you get 2 smaller strips of leftover fabric.
Iron flat any squares that have a fold line in them.
All in all, it took me less than an hour and that includes all the ironing, photo and note taking -not bad eh? I can't believe it - I'm all done, everything for my quilt top is cut out and ready for class, it took no time at all and wasn't the chore I imagined it would be thanks to using the
Shape Cut Plus - oh and, of course, I should say a big thank you to Tatty who, as you can see below, has been busy helping me :)
Click this link to see all of my Tutorials, Hints & Tips
Disclaimer: This post is for informational purposes only, no payment or commission is received on click-throughs and opinions are my own.


