My word for the year is 'trust'. It kept coming up for me at the end of 2021, so I decided it needed to be part of my focus for this year. Do you have a word for the year? Seven weeks in, how is it serving you so far if you do?
teaching sewing confidence, tip by tip
Showing posts with label reverse applique. Show all posts
Showing posts with label reverse applique. Show all posts
Thursday, 17 February 2022
Sunday, 1 December 2013
Acts Of Kindness - A Reverse Applique Tute: My November 2013 NYC Mod Quilt Guild Bee Block
"No act of kindness, no matter how small, is ever wasted." - Aesop
I'm so happy with my November NYC Mod Quilt Guild Bee Block. This month's Queen Bee Rossanna sent out an even more simple package than Queen Bee Maria did last month.
A rectangle of cream fabric printed with white roses and her instructions seemingly simple too -
Your inspirational word is: Kindness
which will be the motivation for your design ... easy to read on your block, any lettering. ... reflect how that inspirational word resonates with you. ... recreate those feelings into something wonderfully tangible that everyone else can see and feel inspired. Please use the piece of fabric provided for the background ... .
Well, such simple instructions create a huge dilemma: where to start and how to show kindness as a word on a block? As usual, I sat on the block for a couple of weeks, truth be told there were no ideas coming so I can't even say I was playing around with them but earlier this week it came to me - no need to mull it over, I just knew what I was going to do.
I decided to make an Inspirational Acts Of Kindness Block out of two types of fabric:
Type 1: fabric I have used to make gifts to give to others - my creative kindness to them; and
Type 2: fabric others have given to me - their kindness which helps and inspires me to create.
I believe whatever we create from fabric is a form of kindness to the recipient.
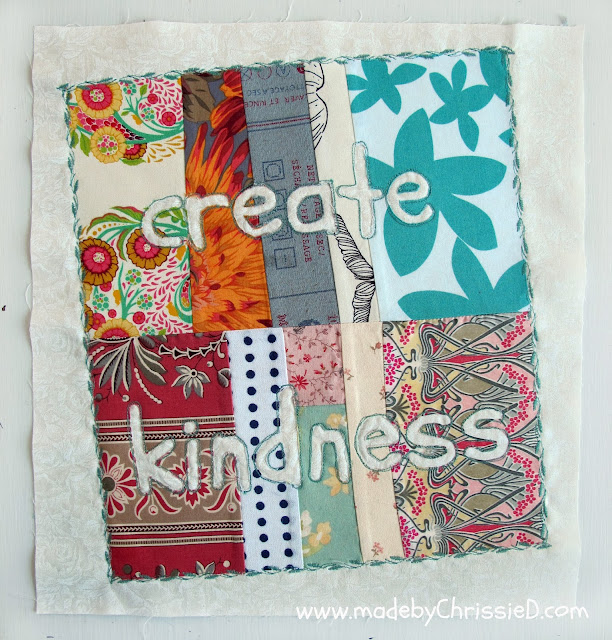
So here's my created piece of kindness fabric:
The top row is Type 1 fabrics - fabrics I've given to others while
the bottom row is Type 2 fabrics - fabrics given to me.
Then I printed out the words 'create' and 'kindness' - nothing fancy here, just a Word document and a normal sheet of standard printer paper.
I have a glass table which is just perfect to use as a light box to trace words/designs off onto fabric.
I placed the printed sheet on the table with the fabric over it - a spot lamp under the glass and traced the words off onto the fabric with a marker pencil. If you don't have a lightbox or glass table you can also fix paper to a window using sellotape/scotch tape/masking tape and use natural light or a spot lamp behind to trace off your design.
Next, I ironed a piece of lightweight double sided fusible 'HeatnBond Lite' onto the back of my kindness fabric rectangle.
I left the fusible backing paper attached and using a pair of small, pointed and very sharp embroidery scissors I cut out each letter through both the fabric and the fusible. I love the letters I've cut out too - I'm thinking I'll create a 'mantra' cushion for myself with them at some point.
Once all the letters were cut out I peeled away the fusible backing paper sheet.
And ironed the kindness fabric onto the background fabric provided by Queen Bee Rossanna. This 'glues' the fabrics firmly together and allows for easy sewing over the block.
I selected an embroidery stitch and secured the outside edge of my kindness fabric onto the background fabric and then I free motioned twice around each letter and secured all thread ends. If you prefer you can zig-zag around the fabric letter edges to prevent fraying but I chose this freehand, raw look for the block.
Here's a little more detail of the stitching and that Aurifil 50/2 2850 - Med Juniper thread.
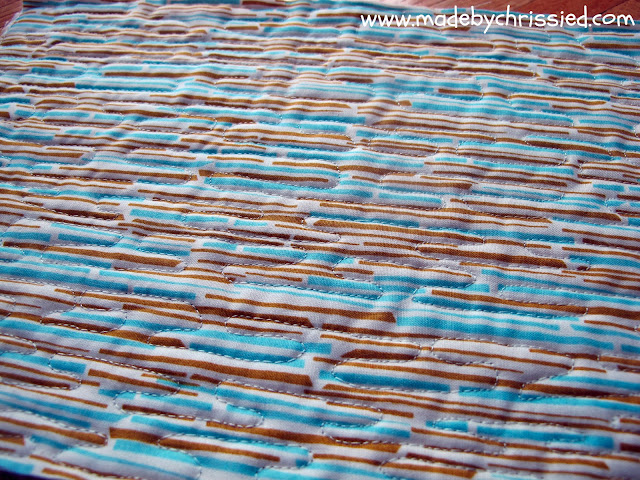
I even love the back!!!
I feel a bit odd calling this a tute as there's not that much to share with you instruction wise - but the truth is reverse applique really is that easy :D
As always you can check out all the blocks that our Bee make for Rossanna on my Quilty - Inspirational Block Pinterest Board - I'll add more pins as each person in the Bee posts photos of their finished blocks and you can see my NYC Mod Quilt Guild Post here too.
I'd like to take the opportunity also to thank all my blog readers for continuing to support me here at made by ChrissieD. Last week my little blog passed the 300 follower mark on Bloglovin alone and I know there's many more of you following via numerous other social media. It doesn't seem too long ago I was keen to reach 10 followers then 20 then 50 and so it continues!!!
I'd like to take the opportunity also to thank all my blog readers for continuing to support me here at made by ChrissieD. Last week my little blog passed the 300 follower mark on Bloglovin alone and I know there's many more of you following via numerous other social media. It doesn't seem too long ago I was keen to reach 10 followers then 20 then 50 and so it continues!!!
Whatever method you're using to read my posts a very big thank you for your continued kindness :D
Labels:
Aurifil,
Bee Blocks,
double sided fusible,
HeatnBond,
kindness,
lightbox,
NYC Mod Bee,
NYC Mod Quilt Guild,
Queen Bee,
reverse applique,
Story Of You,
Tute,
Tutorial
Sunday, 24 February 2013
Selvedge Block and QAYG Quilting - The Something NEW Sampler: Week 6
A week of QAYG quilting on
hosted by Amy @the cute life
This week I have wrapped up all the Quilt As You Go (QAYG) quilting on the 9 blocks and added a 10th Selvedge block to finish my layout.
Block 10 - Selvedge Block
I've wanted to try a Selvedge Block for ages so this seemed like a great opportunity to learn another technique and round the number of blocks up to 10 which would make the final layout easier. This is quite appealing as it's now a QAYG quilt so I've decided to opt for a simple grid layout while I'm learning my new QAYG skills.
To make this selvedge block I spray basted the backing sheet to the batting and then sprayed more basting spray onto the top of the batting. I then started laying my selvedge strips from the fabrics used in making this quilt onto the batting overlapping a finished edge over each raw edge. The strips held firmly in place, thanks to the basting spray (my new favourite tool!) and then I quilted along the selvedges with very closely spaced lines making sure to catch down all the selvedge edges.
I loooovvve this block, I'm so glad I tried it and I love too that it records all the fabrics used in the quilt which is really neat.
QAYG Details for Blocks 1, 2, 3, 4, 5 & 8
(not necessarily in that order as I'm sick of fighting with html code each time I try to move things around!!!)
Block 1 - Bargello
Block 4 - Reverse Applique
You know I was so unsure about this block but I decided to do echo quilting around each reverse applique opening and in the end I've decided to keep it the final quilt layout.
Block 5 - Sashiko
Block 2 - Scraptastic
Block 8 - Pinless Curves
Block 3 - Folded Block
and here's my plan for the final QAYG layout

and this is how the back will look
I just can't 'relax' into free motion quilting (FMQ) - I've followed all tips and advice, drinking a glass of wine, drinking two glasses of wine, drinking a bottle of wine, listening to great music. I've got an adjustable Tempur-Pedic chair and a Sew Ezi sewing table so my machine bed is level with my working surface, I have a Supreme Slider mat and a Quilt Halo ring. Sometimes I use my Bernina BSR on settings 1 and also 2 and sometimes I use my darning foot with the stitch set to 0 and the feed dogs down and then again sometimes with the feed dogs up (to keep the tension working) and the Supreme Slider in place. The only thing I don't seem to be able to change is ME - I just can't relax while I'm fmqing and I've paid the price this weekend for all my work - I've got a frozen neck and shoulder so I couldn't sew yesterday and, although it's loosening a bit now, I think I should leave it alone today as well.
Need a trip to my LQS today though to pick up some fabric to sash and bind the quilt. Quite nervous about this next stage - I've read lots of great tutorials but just want to get on with trying it for myself now.
I'll be back with a finished quilt for you as soon as my neck and shoulder will let me!!!
You can follow The Something NEW Sampler on flickr
Featured On:
Linking To:


Featured On:
Related Posts:
A Modern Bargello
Scraptastic & Folded Blocks - The Something New Sampler: Week 2
Reverse Applique & Sashiko Blocks -The Something New Sampler: Week 3
Trapunto & Pinless Curve Blocks - The Something NEW Sampler: Week 4
Machine Applique and Cathedral Windows Blocks - The Something NEW Sampler: Week 5
Scraptastic & Folded Blocks - The Something New Sampler: Week 2
Reverse Applique & Sashiko Blocks -The Something New Sampler: Week 3
Trapunto & Pinless Curve Blocks - The Something NEW Sampler: Week 4
Machine Applique and Cathedral Windows Blocks - The Something NEW Sampler: Week 5
Linking To:


Labels:
Bargello,
BSR,
FMQ,
Folded Block,
Pinless Curves,
QAYG,
Quilt Halo,
reverse applique,
Sashiko,
Scrappy Block,
Selvedge,
Sew Ezi,
Something NEW Sampler,
spray baste,
Supreme Slider,
Tempur-Pedic,
Tutorial


