teaching sewing confidence, tip by tip
Showing posts with label Simon. Show all posts

Monday, 22 December 2014

To Boldly Go - A Trekkie's Travel Bag


Even men need travel bags, and masculine laminated cotton isn't always easy to find.  For Christmas 2013 I was on a travel/wash bag roll and everyone in my family received one as a Christmas gift, including the men.  This is the travel bag I made for my husband, Simon.


The outside laminate is NYC Subway map - on licence from MTA and available only from The City Quilter in Manhattan where I teach.  Available in 100% cotton and also as a laminate it's a really great print - I've used it for quilts 


and gifts.


So the laminate was a perfect choice for Simon's travel bag...


... and inside I included some fabric from one of his all time favourite TV series - Star Trek by Camelot Cottons.


I fussy cut the fabric so The Enterprise was as visible as possible.  I've turned the wash bag inside out here so you can see just how that lining looks!


And then the co-ordinating tissue cover and yes that too has Star Trek lining.


Over the last 12 months, Simon has travelled across the world pretty much weekly and the travel bag has boldly gone with him - it's safe to say it's been a huge hit.


You might be interested in also seeing another masculine laminate fabric I've used for wash bags, I've posted about it here: A Good Snapshot Or A Total Wash Out?


Disclaimer: 
This post is for informational purposes only, no payment or commission is received on click-throughs and opinions are my own.

Follow on Bloglovin


Tuesday, 11 November 2014

Happy Flowers - A Liberated Nine Patch Semi Tute


Queen Bee Rossanna set quite some challenge with November's Bee Block.

Some months ago Rossanna asked us all to start collecting wrappers from sweets or biscuits, tea or coffee - well wrappers from just about anything ready to make her November Bee Block.  

I drink tea, lots and lots of tea, so I started saving the wrappers from my tea bags.


As November came around Rossanna sent out her instructions and fabric.

Here's the fabric - Turtle Bay in olive for the Prince Charming collection by Tula Pink.


and the gist of her instructions were:

The blocks are to be part of an enchanted garden of a quilt.

1. ... make two 8.5" totally creative, free form, liberated, nine patch blocks using greens.  Use the green fabric provided in each.
2 ... over the green nine patch blocks create awesome happy flowers from combinations of fabric (any type) and your saved wrappers.
3  ... feel free to use embellishments whatever you decide!


I wouldn't like to call what follows a tute but I have explained my process so I'm calling it a semi tute.


Pulling some green from my scrap box I discovered I didn't have that much really - plenty green with other colours but I wanted to keep the blocks just green - so this was my pretty poor fabric selection.


Next, I cut the given Tula fabric into six random pieces.


Here goes for the first block.  I sewed 3 fabrics together into a strip and trimmed, then I added another strip of 3 fabrics and then a third strip.  I cut in any direction, paying no attention to seams and joins apart from making sure I was working larger than the 8.5" required for the block so I had plenty fabric for trimming down to size.


For the second block I included much more of the given fabric and created it the same way as the first.


And that's the two liberated nine patch blocks completed.


On to the flower embellishment.  I really didn't know where to start - only that I had all these tea bag wrappers.


My instant idea is to make a flower petal from each tea bag wrapper, layer them up to create the flower, so I just go with it and start cutting a large petal from the first wrapper.  I keep one section of the fold of the wrapper in place to hold the two sides of the wrapper petal together - my thinking here is this will make the petal thicker, slightly stronger at the centre of the flower and give the petal colour on both sides.


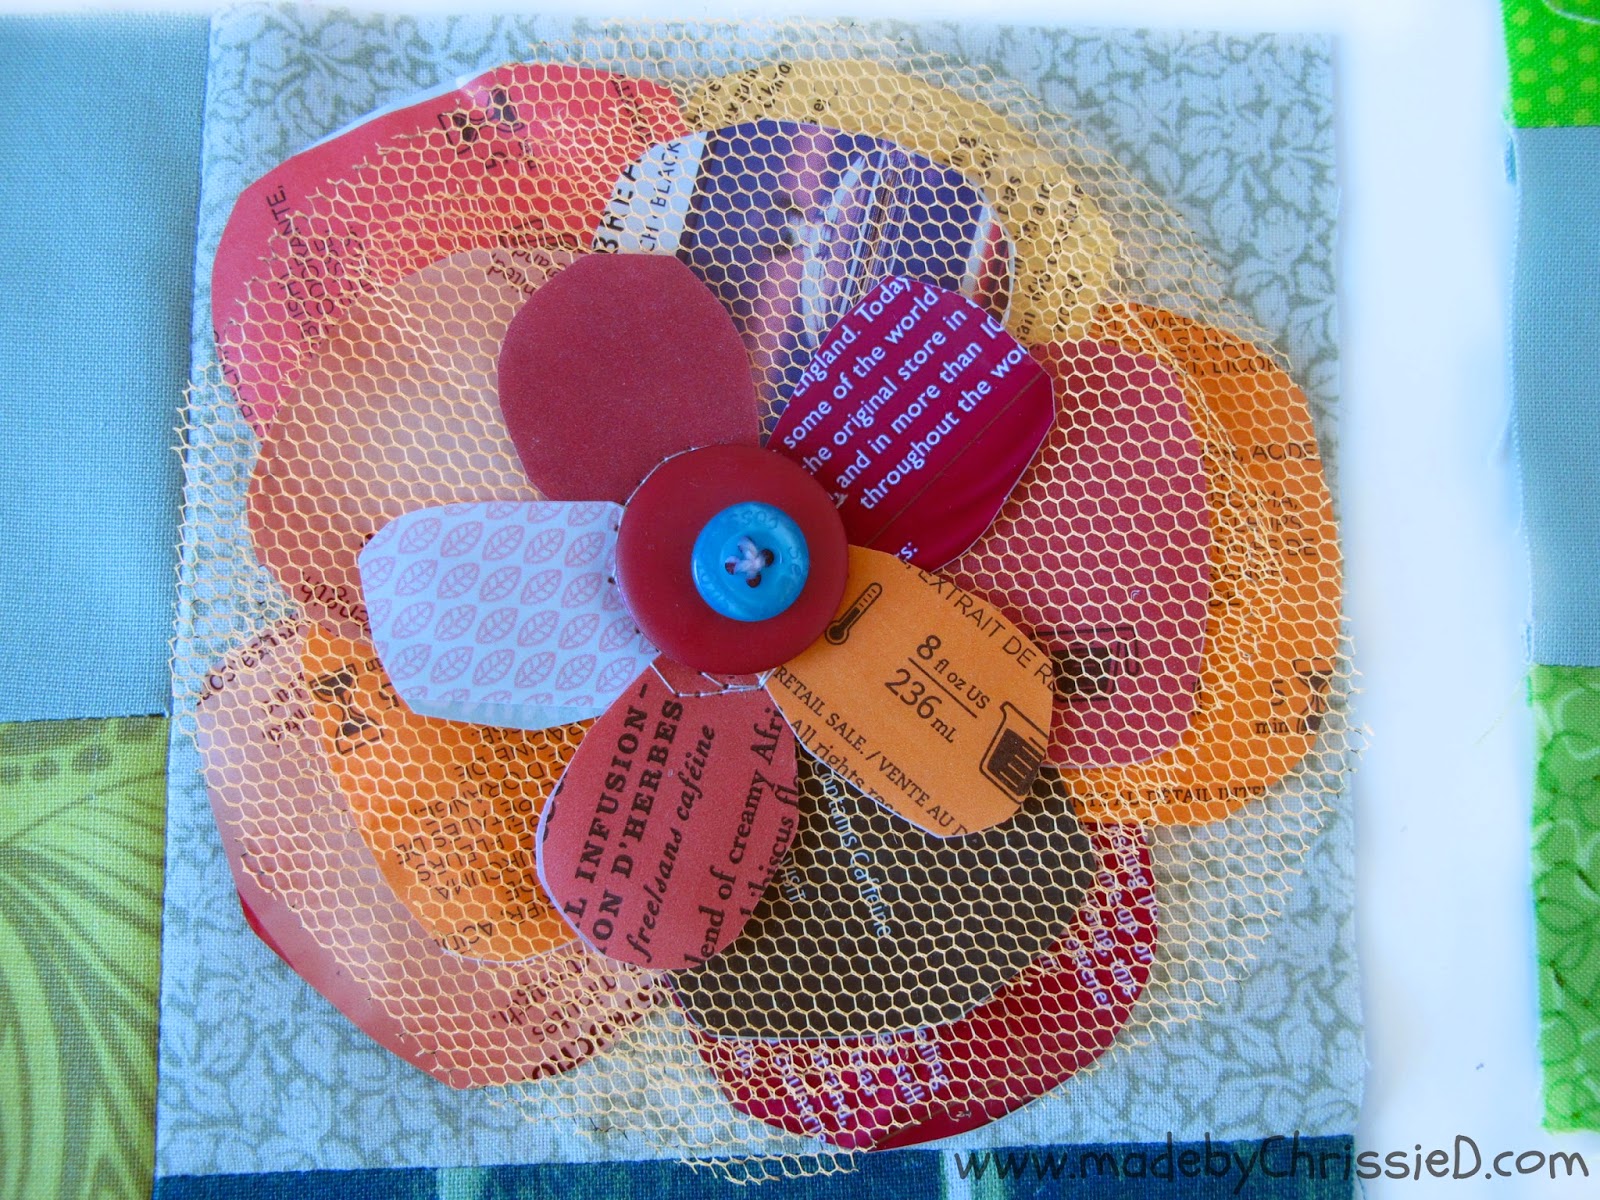
Here's how I layered up my first flower:
Pic 1: I used extra large petals and sewed around the centre;
Pic 2: then I sewed a circle of orange/yellow netting over it;
Pic 3: added another layer of 5 petals slightly smaller than the first layer;
Pic 4: another circle of orange/yellow netting;
Pic 5: a final layer of 5 petals smaller again.; and
Large Pic: then I sewed the flower onto the block.


I finished the flower off by hand sewing two buttons on top of each other over the centre of the flower - sewing right through to the back of the block.


And for the second flower:
Pic 1: I took a piece of lime green sheer ribbon and sewed two rows of straight stitch 1/4" apart along one edge of the ribbon - I used my Bernina's maximum stitch length;
Pic 2: I knotted one end of the two rows of straight stitch together to hold that end and then pulled one piece of each thread at the opposite end which ruffles the ribbon, pulled the ends tight and knotted them;
Pic 3: I sewed the ribbon circle onto the 8.5" block;
Pic 4: As in the previous block I sewed 5 petals to the centre of the ribbon;
Large Pic: I made another ribbon circle as before and sewed it on top of the petals. 


As previously I sewed two buttons on top of each other through from the back of the block to finish the centre of the flower.


And a couple of close-ups of those flowers.


 Really wasn't sure what I was going to make for this month's Bee Blocks or how they'd turn out, I'll go as far as to say I didn't think I'd like this one at all but, as is often the way with my Bee Blocks I enjoyed the process and love the finished blocks.  My husband, Simon's thrilled the blocks are finished too, he said: "does that mean we can stop saving our tea bag wrappers now?"!


I have no idea how Rossanna is going to sew all the blocks together - the flowers we're making are going to be so fragile and I can't imagine quilting around them either.  I'm guessing it's going to be an art quilt as, again, it's too fragile to use and can't be washed.  When I know more I'll share it with you, in the meantime, you can check out all the other blocks as they're made here on my Quilty - Happy Flowers Liberated Nine Patch Blocks Pinterest Board.


And you can click this button below to see all of my NYC Mod Quilt Guild Bee Blocks and Challenge Blocks/Quilts.


Disclaimer: This post is for informational purposes only, no payment or commission is received on click-throughs and opinions are my own.

Featured on:


Follow on Bloglovin


Monday, 5 May 2014

Finally Showcasing My 'Even The Dog's Got Two' Quilt


For the longest time my husband, Simon, kept commenting that I made quilts for everyone else but not for him.  I didn't pay any attention until the day he said

"everyone else has at least one quilt except me, even the dog's got two".

It couldn't be denied, the evidence is right here on this blog:


I needed to put matters right.  

I think I'd been putting off making him a quilt because I knew Simon would probably like his very own space themed Star Trek or Doctor Who quilt but there's no way I'm having anything like that in my living room as I have to live with it too. I'll leave you to make your own mind up whether I'm a total control freak ex-interior designer or maybe I just don't love him that much - either way, this is the plan I came up with.


For some time, as they wore out, I'd been collecting Simon's cotton and linen shirts and linen trousers all in shades of blue and brown so even when he's off to work he always co-ordinates with my apartment colour scheme.  At the same time, I saw a sample quilt hanging in a Manhattan quilt store for a  Pleated Patchwork class by Andrea Deal, you can see Andrea's quilt here on her website. The quilt is from the book Modern Neutrals by Amy Ellis @Amy's Creative Side and I knew this would be a perfect way to use the shirts/trousers and I think the quilt has a very strong masculine design too.

Here's a handful of photos taken as the process was ongoing


Other projects kept taking precedence over the quilt and although it was meant to be Simon's Christmas present I didn't actually finish it until Boxing Day (that's the day after Christmas Day celebrated by Commonwealth countries) but the good news is, Simon was thrilled with it.  I think I should tell you at this stage that I did also make him a travel bag lined with Star Trek fabric that I'll share with you another time so don't judge me too harshly as totally inadequate wife material (though I did say 'lined with', well I draw the line at it actually being visible!!!).

Obviously, over winter the weather was dreadful and I never got around to taking photos of the quilt.  I did pass comment that possibly the quilt should never actually be used as if it ever needed washing I really didn't want to stand and iron all those pleats back into place.

So this is the bit of the story where I totally get my comeuppance.

Our new pup, Watson, threw up on the quilt.
He committed his crime on a Saturday when I was working at the quilt store and Simon set to, washing the quilt and tumbling drying the life out of it till it was bone dry.  Every crinkle and crease were well and truly fixed in place, no iron was sorting out that mess.

Here's the only photo that exists of the quilt in its perfect, pre-washed state, taken by Nellie at our February NYC Metro Mod Quilt Guild meeting.
 .

Last week we finally had a few days of brighter weather, suitable for taking quilt photos.  I quickly rewashed the quilt and while it was still soaking wet I ironed it.  I was amazed how perfect the pleats still were, washing didn't affect them in the slightest and they required minimal if no ironing.  The most difficult part of the quilt to iron was the back - it's made from Peppered Cottons and no amount of pressing can make it look pristine as you're always pressing against the lumps and bumps of the pleats on the underside.

Ironed as best as I could manage I left the quilt to hang dry overnight and here are the pics from its photocall last week:


The quilt is really heavy and incredibly warm.  I guess the quilt top is actually three layers of fabric due to the way the pleats are created and the pleats themselves probably trap air and, therefore, heat.


This pic shows how difficult it was to iron the peppered cotton flat but you can also see how I've quilted it - either side of the ditch to create the square design and to avoid sewing over the pleats and spoiling the texture and effect of the quilt front.


So the long-suffering Simon, at last, has his own quilt to stay warm under on a cold winter's night, finally a happy ending ...
well, that's not quite how it is ...

there's two little people who have their own ideas about the new quilt on the block and they're not moving anywhere fast.  


Poor Simon, maybe I'll make you another quilt sometime or maybe you're just not meant to have a quilt at all? x

Find out more about the life of this quilt here:


Disclaimer: 
This post is for informational purposes only, no payment or commission is received on click-throughs and opinions are my own.

Follow on Bloglovin