teaching sewing confidence, tip by tip
Showing posts with label Quilting Bee. Show all posts

Tuesday, 13 August 2013

Recreating Klimt - My July 2013 NYC Metro Mod Bee Block

Time to sort out my July NYC Metro Mod Bee Block - Queen Bee Deidre did say there was no hurry but I figure now Joe and Katie are back in England and Flicky's off to Seville to visit Jack, it's time to clear the decks again - crikey that might mean getting up to date with my Skill Builder BOM by the end of the week and we all know how I love to fall a few months behind with that one so don't hold your breath!!!


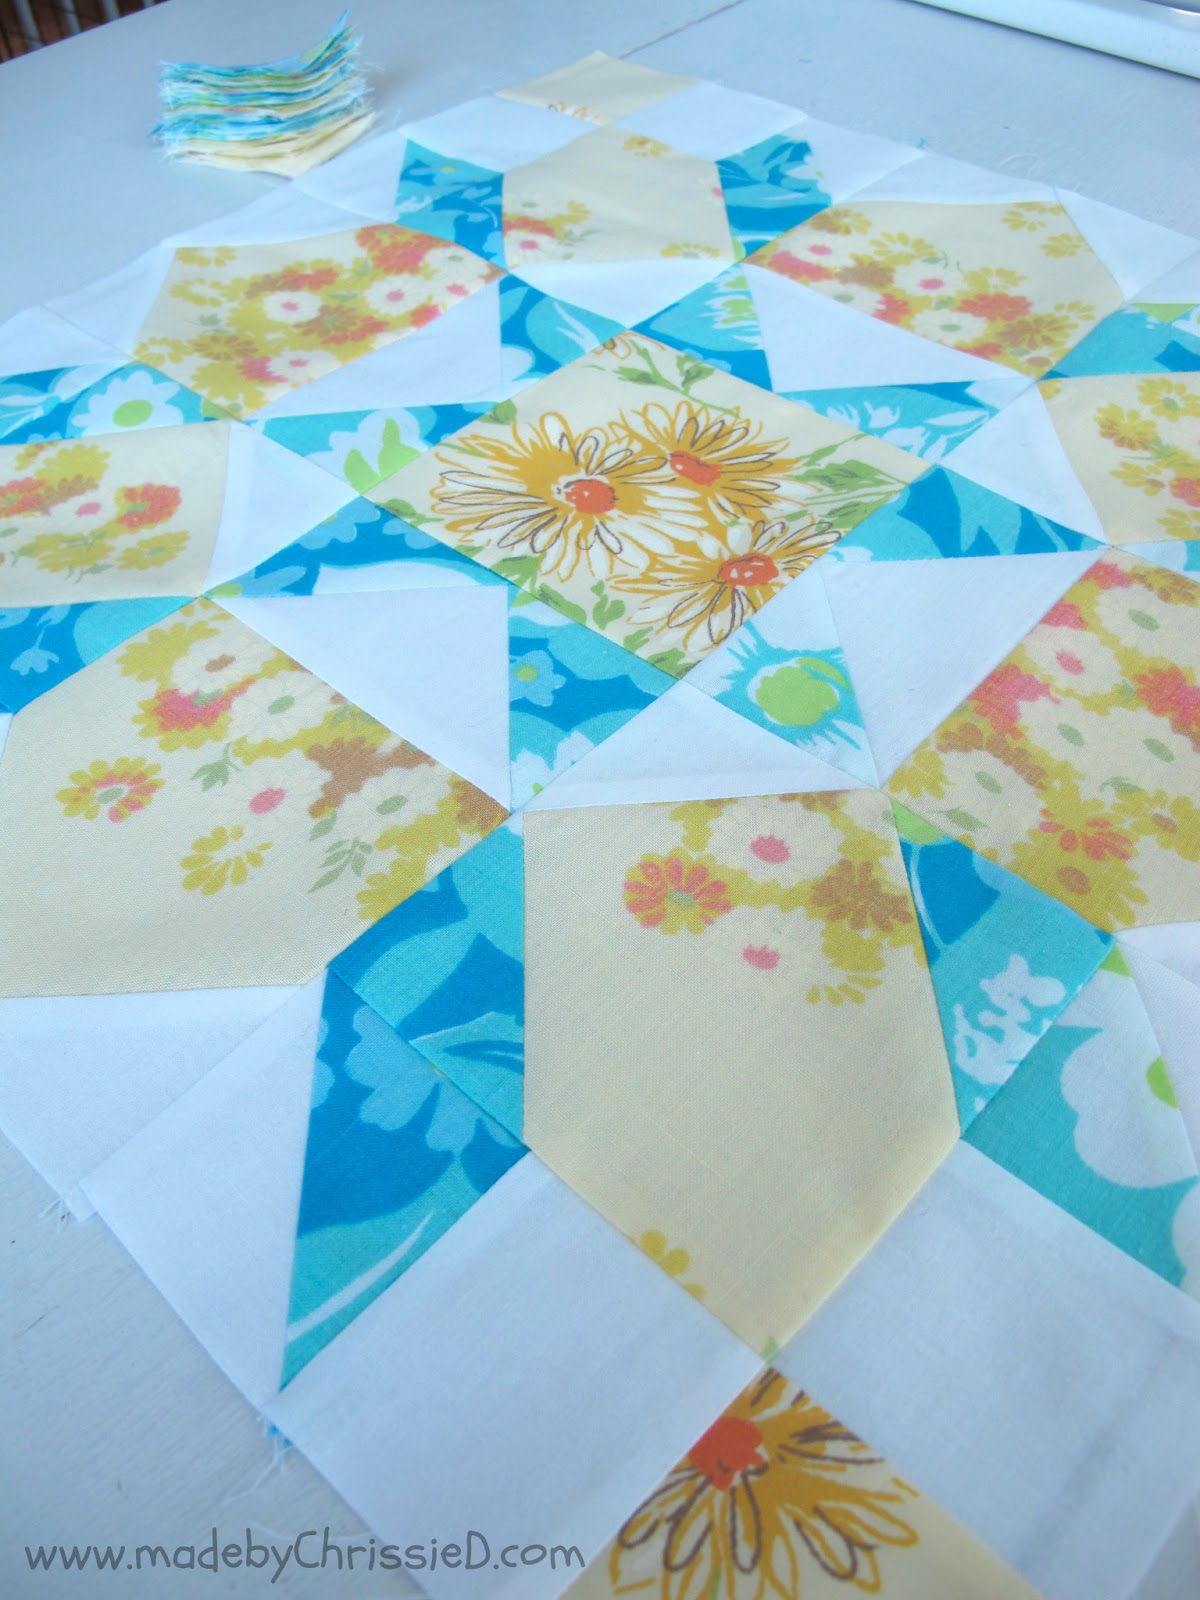
Before we start - here's the finished block - I read somewhere that it's best to give people a glimpse of the end result at the start of a blog post - hooks them in, makes them read more of the post.  Well the real reason I'm doing this is because Bloglovin (and I guess most feed readers) uses the first image from a post and I don't want that image to be a sheet of paper with a piece of yellow fabric - don't know about you but when I'm skimming down my Bloglovin 'to read' list a picture like that's not going to get me doing the magic click through to the post itself!

Now on to the real post:


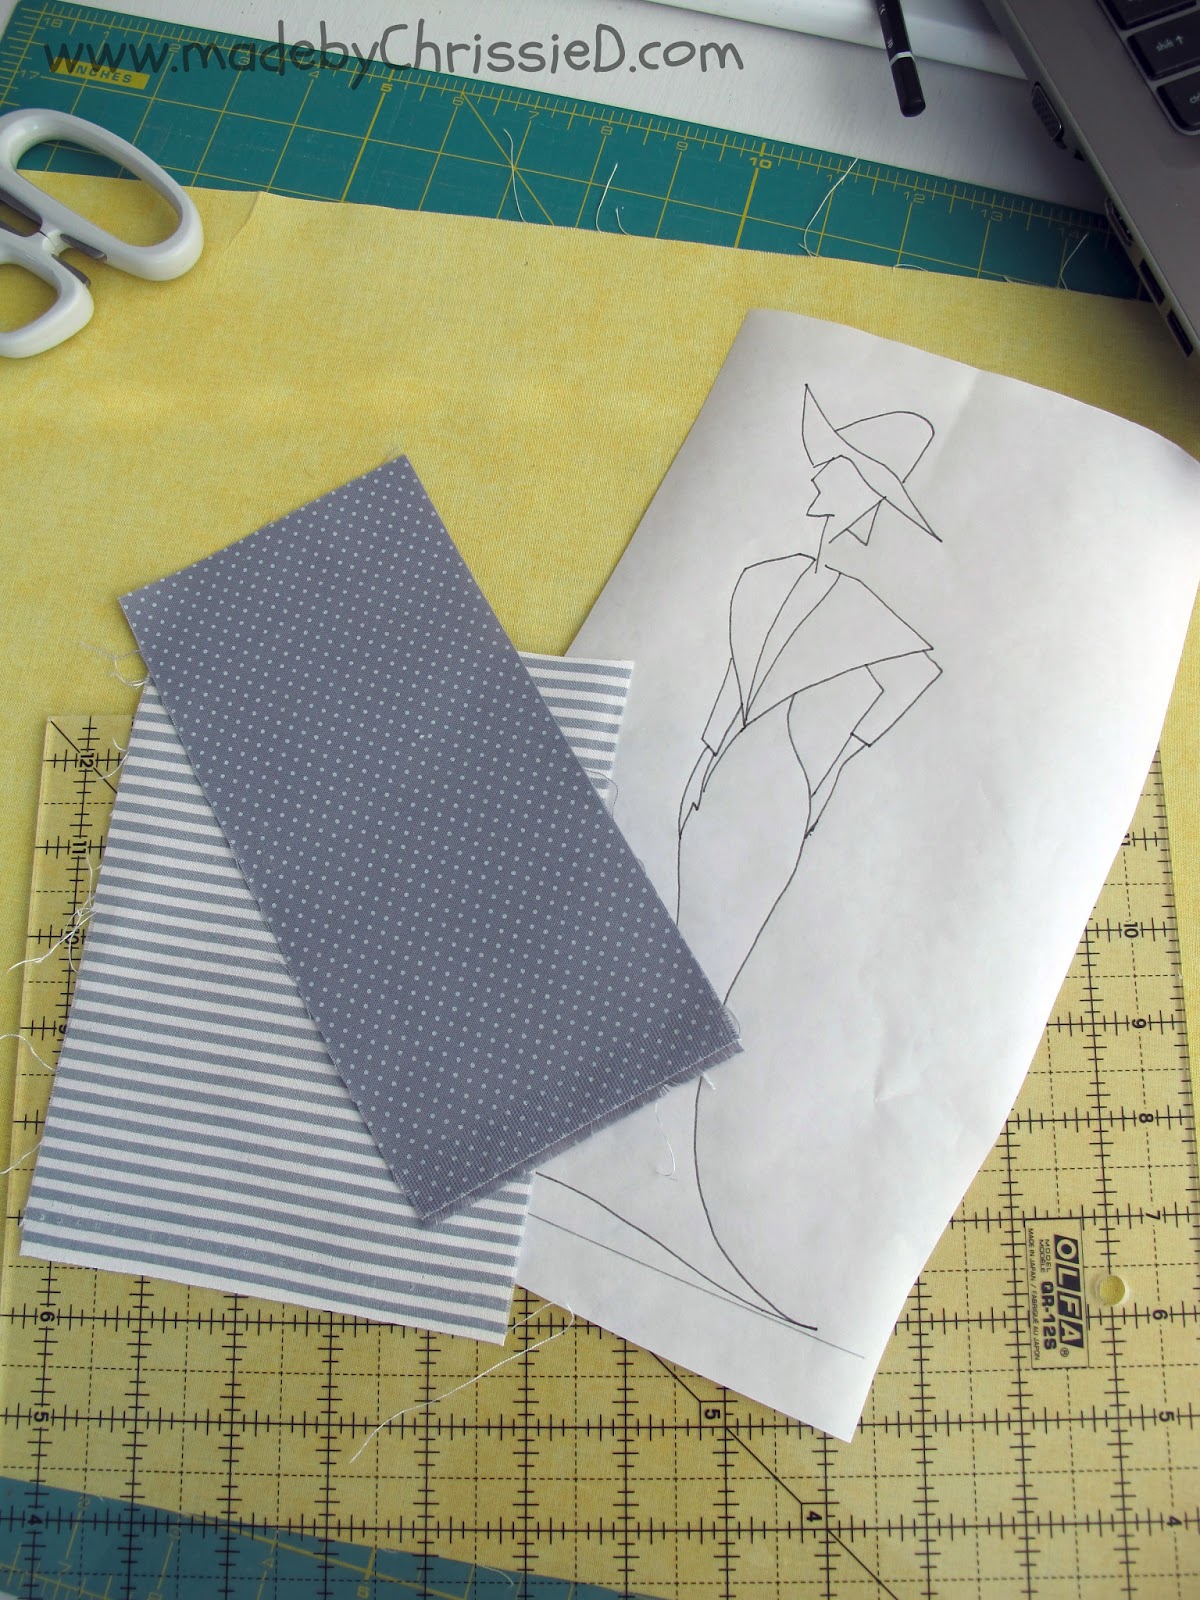
This is what Queen Bee Deidre sent me - a piece of yellow and metallic gold fabric and some instructions:
make a block inspired by a section of this painting (see below), any size, style or shape block, try to keep to colours similar to the original, use some of the included fabric somewhere in the block.

Gustav Klimt 'The Kiss'
I chose this section from the man's robes:

Using Photoshop I edited the section using the 'Cut Out' filter - this defined the design and colour sections more.

Using a pen and ruler I divided the section into strips and blocks I could reproduce as part of a quilt block.

I raided my stash and chose colours appropriate for the block - Kona solids (black, yarrow, wheat, corn yellow and curry) and a small piece of Timeless Treasures 'Sketch' to add a little interest and texture.

I labelled the sections with my colour choices and cut into three strips.

I started sewing strips of fabric together, slicing as I went - no measuring just piecing and seeing what happened. 
This is the first strip complete.
I did have to take more care sizing the next two strips to make sure the overall length was the same as the first so all three strips could be joined together.  I still didn't measure, I just did it by eye.

The finished block

And that first photo again!

As always I had a lot of fun making the block.  I like the unexpected challenges being in a Bee brings - fabrics, colours, designs, styles you would never dream of using yourself that involve pushing your own boundaries,  I really enjoy the months we have a more artsy, creative challenge rather than following a pattern, makes you have to think and step outside the box a bit - great stuff :)


You can also check out all the blocks that our Bee make for Deidre on my Quilty - Klimt Pinterest Board - I'll add more pins as each person in the Bee posts photos of their finished blocks and you can see my NYC Mod Guild Post here too.


Click these buttons to see more of my NYC Mod Guild blocks and my tutorials

Disclaimer: This post is for informational purposes only, no payment or commission is received on click-throughs and opinions are my own.

Follow on Bloglovin


Sunday, 9 June 2013

Can You Tell The Difference Between A Dutch Rose And A Swoon? - My June 2013 NYC Metro Mod Bee Block


My NYC Metro Mod Guild June Queen Bee is Kimberly, she shared details of her Dutch Rose block here on our Guild blog  and pointed us to some great instructions for the block by Candace @TheDoubleNickelQuiltChallenge

And this is the fabric package that arrived in the mail.


 I hadn't heard of the Dutch Rose block before though I thought it looked vaguely familiar, in fact remarkably similar to the Swoon blocks that are so popular across the quilternet right now - one of my favourite Swoon quilts is this one by my quilty friend Sam @ACupOfTeaAndASliceOfCake aka UKMUMINUSA.

I did a bit of research and the best explanation I found for the difference between the two blocks was here by Jess @TheElvenGarden.  Jess says that the traditional Dutch Rose block is created using Y seams and 'true' diamonds and the Swoon block is a modern 'easier' HST version of this.

So here's my finished block and a pile of all those extra HST 'bonus' blocks.


    It wasn't a difficult block but there's a lot of cutting and then the sewing is very bitty, nothing to really get your teeth in to, you're up and down between the machine, ironing board and cutting mat like a mad person, even if you chain piece.

There's no denying though that it's very pretty once it's done and all the Swoon quilts out there are proof of just how gorgeous this is going to look when it's made up into a quilt.


You can take a look at all the blocks that our Bee have made for Kimberly on my Quilty - Swoon/Dutch Rose Pinterest Board - I'll add more pins as each person in the Bee posts photos of their finished blocks and you can see my NYC Mod Guild Post here too.


And you can click this link to see all of my NYC Mod Quilt Guild Bee Blocks and Challenge Blocks/Quilts.


Follow on Bloglovin


Friday, 17 May 2013

How To Make A Modern Sunbonnet Sue - My May 2013 Bee Block


My NYC Mod Quilt Guild  Bee has entered a new year and E gets to be Queen Bee again - you might remember that last year she had us create blocks for her Bible Quilt.

This year E has come up with another wonderful challenge - a modern take on the traditional Sunbonnet Sue/Sam.
Here're the fabric and instructions that she sent out to us


This was a great chance for me to do something a bit more artsy so here's photos I took along the way so you can see a bit of my planning and design and how I created the block

Outline sketch of Sunbonnet Sue on freezer paper.
Fabric detail added to sketch.
12.5" square drawn onto yellow fabric with a blue water erasable marker, if you squint you can just about see the blue lines drawn on the fabric.  Don't cut the block to size yet as the fabric may 'shrink' when you satin stitch the applique onto it.
Sections of sketch cut out and ironed onto fabric (freezer paper adheres to fabric but not permanently).  The fabric is ironed onto the top side of light weight double sided fusible.
Hang on to all the small cut out bits of the sketch that don't need to be ironed onto fabric, you'll need them later to create an outline on the fabric.
Iron the freezer paper sketch outline onto the background fabric in the exact position that you want Sunbonnet Sue to be and draw around the outline as a template - I again used water erasable marker at this stage. 
Remove outline template and place cut out fabric sections of the sketch on background fabric to check placement.
Now I used a fabric pencil to draw over the sections of the outline that I wanted to create with a stitched line on the finished block and then I used water to erase all the blue lines from the fabric
I removed the backing paper from the double-sided fusible and ironed the fabric pieces into their final position on the background fabric and then I removed the sketched freezer paper from the top of each piece.
I used a straight stitch to sew over all the pencil lines on the background fabric and once this was done the pencil lines were no longer visible beneath the stitches.  Next, I used a satin stitch to outline the edge of each fabric piece and to hold it securely in place.  I changed the colour of the thread in different areas to add detail.
I knotted and sewed all the threads through the stitches on the back of the block and then cut the block to size (12.5")

 I'm in love with my finished block - is that okay to say out loud?  I love her so much I'd like to keep her for myself.  I'm very reluctantly going to pop her in the post to E over the weekend and can only hope that she loves her as much as I do. 


I really can't wait to see other blocks for this quilt being posted, it'll be fun to see what everyone else's take is on a modern Sunbonnet Sue/Sam.

You can see my NYC Metro Mod Guild post about the Bee Block here.


Related Posts:
Related Pinterest Boards:

Click these buttons to see more of my NYC Mod Guild blocks and my tutorials


Disclaimer: This post is for informational purposes only, no payment or commission is received on click-throughs and opinions are my own.

Follow on Bloglovin


Wednesday, 13 March 2013

Proceed With Caution: Highly Contagious Block Alert! - My March Bee Block


 So when my NYC Mod Quilt Guild March Queen Bee Carole asked us to create a Scrappy Trip Around The World block my immediate thought was "On no not that block again, I'm so sick of seeing it on the Quilternet and I can't believe I'm now going to be making and then posting about it!".  

Anyway, Carole must have read my mind because guess what the next sentence in her instructions said ...  
"I hope you aren't too tired of seeing them up all over the blogosphere."

Ooops!!!

So here goes and I do apologise firstly for offending anyone who has already made/posted about this block and secondly to anyone feeling the same way as I do for boring you with 'that block' again - though if you're anything like me you've already jumped out of this post on your Google Reader and on to the next - don't worry there's no hard feelings on my part if you're about to do just that ;)

Then again, if you're interested in making this block for yourself then Carole pointed us at a great instruction link:
Bonnie K Hunter - Quiltville's Quips & Snips - Take A Scrappy Trip Around The World

Carole supplied us with one 16" x 2.5" strip of fabric for the block and we were to use our own stash for the other 5 strips.
Here's the 6 strips - Carole's is the bottom floral which I have placed slightly apart from my 5 choices. 


I've chosen 2 Kona Solids, Joel Dewberry's Cool Stream palette - Modern Meadow Acorn Chain for Free Spirit, Kaffe Fassett Rustic Floral and Kaffe Fassett Spot. 


The block was surprisingly easy to make using the same technique that I used for my Modern Bargello block as part of my Something NEW Sampler Quilt.


!!! READER BEWARE !!!

The finished block was quite shockingly a huge hit in our home, we all agreed that it has turned out great.  There was even a slight murmuring of desire for a whole quilt of it - oh my goodness me, I can't believe I've even typed that let alone expressed that impulse aloud with my daughter in the comfort of our apartment.  Now I understand why there's a glut of this quilt all over Blogland - obviously this must be a commonly experienced side effect for anyone coming into contact with this highly contagious block!!!


And you can click this link to see all of my NYC Mod Quilt Guild Bee Blocks and Challenge Blocks/Quilts.


Follow on Bloglovin


Related Posts:
NYC Metro Mod Quilt Guild: March Bee Block For Carole - A Scrappy Trip Around The World

Related Pinterest Boards:
Quilty - Scrappy Trip Around The World
Quilty - My Bee Blocks

Linking To:
Quilter in the ClosetNYC Metro Modern Quilt Guild


Sunday, 3 March 2013

Need To Nail That Bear's Paw

NYC Metro MOD Quilt Guild December Queen Bee Chris here, wow that's a mouthful!
 I've got all my Bear's Paw Bee Blocks back now so the rest is down to me.  You can read my original posts here.

I've laid the blocks out and admired them but that's as far as it's gone so far.


There's sashing and a border to add and I need to make another 4 blocks myself to bring it up to its finished size.  

Actually I need to make 5 more blocks not 4 - the thing is that my own block for the Bee is one that I made up as a sample, trialling several colourways before purchasing my chosen fabric.  Once I'd decided that this was the quilt and colourway that I wanted to make I ordered more of the fabric and sent that out to all of my bees.  Have any of you spotted the problem yet.


That's the sample block bottom right - yes that Kona Sage is a slighter lighter and more blue dye than the rest of the blocks made from my later fabric order, you can see the difference in this photo although it doesn't look anywhere near as bad as it does in real life where it is SCREAMING at me, so I need to replace that block as well as making the extra four.

It's not the first and only time I've had problems with Kona dye lots and additionally I've noticed that the finish can also differ along with the fabric width - I'd love to hear if anyone else has experienced this.  Remember I shared with you some rabbit fabrics I bought a couple of months ago, 


well I bought that fabric at The City Quilter and chose my Kona solid colours there in the shop - Coal and Charcoal.  Boxing clever I didn't buy my solids there though, I came home and ordered them more cheapily online.  When they arrived they were both different shades - the wrong shades - slightly lighter and blue based rather than green based and low and behold this dye difference means that they don't work with my rabbit fabric.  Additionally neither of them match their sample swatches on my Kona Colour Card - though they don't match any other colours either so I know it's not that I've been sent the wrong colour.


So what to learn from this:

1.  If you're in a shop and you see a fabric that's a perfect match for something you're working on - BUY IT, don't try to be clever just grab it while you can;
2.  Buy all the fabric you might need, and some extra, in one go - don't try to match it at a later date, it's not worth the risk; and
3.  You can save a fortune buying off the internet but be prepared to be disappointed and carry the expense of the dye lot not being what you were expecting.


 A big thank you to all the Bees in my Hive - you've done an amazing job and I hope I do your work and the quilt justice when completing it.

I'll keep you posted :)


Related Posts: