

Who doesn't love a warm snuggle quilt for cold winter's nights?
A flannel top with the added luxury of sherpa cuddle minky on the back?
47" Hand Tied Snuggle Quilt
An adult size version of my Hand Tied Snuggly, it's an easy pattern using simple techniques that will appeal to both beginner quilters and more experienced quilters as a fast make for a last minute gift. There's no batting, you don't even have to machine quilt to finish and I'll walk you through each stage with photo tutorials and lots of mbCD tips.
This is a quilt that gives you a hug.

Disclosure/Disclaimer:
The fabrics for the quilt top and binding were supplied by Benartex at no cost to mbCD for the purposes of the post, all other materials are my own. In all other respects, this post is for informational purposes only and no payment or commission is received on click-throughs to links shared.
Materials
For the quilt top with borders and binding, I'm using 9 flannels from the Jolly Penguin flannel fabric collection by Mitzi Powers for Benartex Fabrics and my backing is sherpa cuddle minky. The quilt will work equally well made from 100% cotton fabrics and if sherpa cuddle minky's not your thing you can use batting and a cotton backing instead.

Tools
Quilting Ruler / Rotary Cutter / Rotary Cutting Mat / Fabric Scissors
Basting Spray / Glue Stick
1/4" Patchwork Foot / Walking Foot / Thread
Pearl Cotton or embroidery thread to tie quilt
Fabrics Requirements
Patchwork Squares - 7 fabrics (flannel or cotton) - 1/4 yd of each (fabrics a b d f g h i)
Patchwork Squares & Borders - 1/2 yd (fabric e)
Patchwork Squares & Binding - 3/4 yd (fabric c)
Backing - 1-1/2 yds sherpa cuddle minky OR 1-1/2 yds cotton backing and 1-1/2 yds batting
Pre-Wash
Pre-washing your fabrics - this is optional when using 100% cotton but essential if you're using flannel as flannel will shrink significantly from washing. The minky, however, won't shrink when washed so flannel must also be at its final size (post-shrinkage) before combining the two materials.
I pre-wash flannel on a medium hot cycle in my machine, tumble dry to half dry, press to almost dry and hang till dry. This Benartex flannel is very soft before and after washing. It washes beautifully with no colour run and there is no pilling on the fabric surface.
Cutting Instructions
(Benartex Jolly Penguin collection fabric codes are shown in brackets)
Quilt Top Patchwork Squares:
fabric a - (6) 6-1/2" squares (10044F-84)
fabric b - (5) 6-1/2" squares (10043F-55)
fabric c - (6) 6-1/2" squares (10045F-10)
fabric d - (6) 6-1/2" squares (10041F-84)
fabric e - (6) 6-1/2" squares (10043F-10)
fabric f (5) 6-1/2" squares (10042F-55)
fabric g (6) 6-1/2" squares (10041F-55)
fabric h (5) 6-1/2" squares (10044F-12)
fabric i (4) 6-1/2" squares (10045F-7)
Borders:
Piece (3) 2-1/2" strips cut from width of fabric (WOF) to create required lengths
fabric e - (2) 42-1/2" x 2-1/2" lengths (10043F-10)
fabric e - (2) 46-1/2" x 2-1/2" lengths (10043F-10)
Binding:
fabric c - 200" x 3" strips (approx 5 WOF strips) (10045F-10)
Backing:
Don't cut the minky backing at this stage, I'll explain why when we're ready to back the quilt.
Design Layout
This is the design layout for the quilt top showing the placement of the Benartex fabrics.

Here's a blank layout so you can try out your own fabric placement too.
Instructions
Cut all fabrics as listed in Cutting Instructions.
Lay fabric squares out as detailed in diagram below.

Join the squares row by row as shown in the diagram below.
Press seams open to minimise bulk - this is particularly important if you're using flannel.

Join your rows taking care to match all seams. As the seams are pressed open it isn't possible to nest them - you can click through to my tute on how to join open pressed seams accurately.

So you've made your 7 rows and now you need to join them.
I've put the following diagram together showing you one way you can join your row, of course, you can simply sew the rows one to the next if you prefer. If you sew them together in the order indicated it reduces the weight of fabric to the left of your sewing machine harp/throat at any one time which reduces stress at the needle and also for your arms and shoulders when sewing.
If you find the diagram confusing here's it is in words - join rows 1+2, 2+3, 4+5, 6+7, 5+6 and finally 3+4.

Add the four borders in the order shown below - the two short borders first and then the two longer borders.
Click through to this post to read my tips for adding borders accurately.

Your quilt top is now complete and should look something like this

Or even like this if you don't have extra fluffy quilt dogs in your home!

Backing Your Quilt
Follow my super easy 5 Step Guide To A Perfect Minky Quilt Back or layer with batting and backing using your preferred quilt sandwich method.
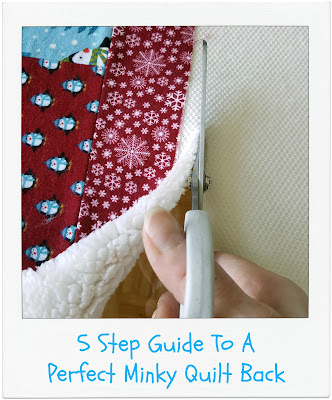
NEVER IRON MINKY - IT WILL MELT!!!
Binding Your Quilt
I bound the quilt with penguin fabric and fussy cut the penguins so they stand correctly around the full edge of the quilt. I've created this Joining Binding Strips & Matching Patterns tutorial to show you how I've done this and how I've joined my binding strips matching the pattern too.

I've machine sewn the 2-1/2" double fold binding in place using a blanket stitch. You'll notice I'm using a walking foot. A walking foot or dual feed makes everything so much easier when working with multiple thick layers too.

First I attach the binding to the minky side of the quilt using a straight stitched 1/4" seam, then I bring the folded edge of the binding back to the front of the quilt.

I use a 5.5 mm wide blanket stitch with a 5.0 mm length and I place the vertical stitch in the quilt top ditch right beside the binding and the horizontal side stitches go over onto the binding to hold it in place.

I bring the folded edge of the binding down exactly on top of the stitch line created when I sewed the binding to the minky side of the quilt which ensures you can't see this previous stitch line once the binding is in place.


Hand Tying The Quilt
Finally, I have hand tied the quilt with #3 Pearl cotton at the cross junction of each square using the hand tying method I have detailed in this tutorial.


Washing Instructions
Cool wash with detergent. DO NOT use fabric softener as this will take the softness out of the minky, no bleach either. Dry on a low heat or line dry - remember direct heat will melt minky.
The Finished Quilt


Snuggle Pattern Available In 3 Sizes


Sharing Your Makes
If you make a Hand Tied Snuggle Quilt using my pattern I'd love to know. You can share pics with me via the following links and using hashtags #mbCD and #madebyChrissieD.


47" Hand Tied Snuggle Quilt
Featured on:


Clicking on an image will take you to a new page of crafty goodness :)


Disclaimer:
The fabric for the quilt top and binding was supplied by Benartex at no cost to mbCD for the purposes of the post, all other materials are my own. In all other respects, this post is for informational purposes only and no payment or commission is received on click-throughs to links shared.
Click to follow Chris Dodsley of made by ChrissieD on Bloglovin'

Linky Parties This post may be linked to some great Linky Parties, always a great source of inspiration too. If you click through to my 'Fave Linky Parties' page you can see where I like to share my work.
these are adorable. thanks for all the tips and help
ReplyDeletequilting lady 2 at comcast dot net
Very cute! I especially like the way you fussy cut the binding. Thanks for the tutorial and all the great tips.
ReplyDeleteI really like the penguin fabrics. Your layout plan is so helpful in placing fabric so it is random yet has some order. It will make the sewing ofthis quilt so much easier.
ReplyDeleteI really like how you set up your tutorial for any person's ideas in placement of the squares. Thank you for making this an simple readable tutorial...love the quilt, but alas, I am one of those nnno mmmminky fabric people, but can always use my fabric of choice as per the tutorial......
ReplyDeleteI really like the quilt. Minky makes the best backing. So soft. Can't wait to feel this fabric.
ReplyDeleteThanks for the tutorials and tips, Chris, especially the fussy cut binding tips. This also helps me figure how to use the fleece from a very large pet bed I received from a friend. The cushion is shot but the fabrics are in good condition after a thorough washing, so just might become a pet quilt for the shelter. I'm glad I found you through the Benartex blog hop! (janeherbst at roadrunner dot com)
ReplyDeleteWow, you write a helpful tutorial. Thank you. Those penguin fabrics are just too cute.
ReplyDeleteHand tied quilts make me feel the love and care put into the quilt. Comforting!
ReplyDeleteShe's cute!
ReplyDeleteAdorable! Thanks for the minky tips - I haven't tried it yet.
ReplyDeletebasaran.family@rogers.com
I too am thankful for the minky tips - I have some to work w/ on a baby quilt right now. I love the sweet penguin!
ReplyDeleteToo hot here to even think about a flannel and minky quilt but I will be sure to come back to this tutorial when I am in much cooler Scotland :)
ReplyDeleteWhat a great snuggly quilt. thanks for sharing
ReplyDeleteThis is an adorable flannel quilt and the Minky backing makes it just that much more fabulous!
ReplyDeleteSo many wonderful tips and such a lovely quilt. Thank you.
ReplyDeleteSo cute. I love how your furbaby is givig his/her paw of approval! Thank you for a great tutorial.
ReplyDeleteGreat tutorial, love the flannels.
ReplyDeleteAnother awesome tutorial Chrissie, thanks for sharing
ReplyDeleteI love how you have the penguins all lined up round the edge - fantastic attention to detail.
ReplyDeleteBeautiful as always
ReplyDeleteThe snuggly backing is just perfect.
ReplyDeleteWonderful tutorial! And I love the minky backing. I often back my crochet blankets with polar fleece for extra snuggliness!
ReplyDeleteThank you for such a detailed tutorial. Your dogs are just as snuggly as the Sherpa minky :-)
ReplyDeleteHugs,
Preeti.
I'm not looking forward to cold weather, but this looks super snuggly indeed!
ReplyDeleteYour quilt looks so cozy. I love the back.
ReplyDeleteThis would be a great way to use up some special crafts or stash, and end up with a great gift :) Thank you for the link to the very informative tute for hand tying a quilt - that's something I haven't learned to do properly. I've pinned it so I can give it a whirl :)
ReplyDeleteCan I use a fleece throw to back the quilt, instead of minky?
ReplyDelete