

Day 2 of my week on the Yuma QAL with Gotham Quilts and today I'm sharing my pics from making the HSTs and then creating the Pieced Triangles
Here're all my fabrics cut ready to make the Pieced Triangles.

Before we start piecing can I take the opportunity to remind everyone that you really shouldn't trust your 1/4" foot or the 1/4" mark on your machine's sewing plate. Please, please, please measure your 1/4" seams and make sure they are just that, on Thursday I'll explain more about the problems I experienced due to my inaccurate 1/4" seams on my Pieced Triangles and I'd hate for you to go through the same!!!
To make the HSTs pair 1 x 6.5" Background Fabric square with 1 x 6.5" Small Triangle square. Note: you'll have 4 x Small Triangle squares spare - these are from the centre section where you have two colours making up your leader Small Triangles rather than using only 1 colour as on the other rows.

Draw a line along the diagonal of the lighter fabric.

Place the two squares exactly on top of each other and sew a straight line 1/4" on both sides of the drawn line.

Your sewn squares will look something like this.

Cut along the drawn line.

The two triangles above will open out to look like the HSTs below.

Press the seams of both squares open as below left.

The finished square needs trimming down to a 6" square - place the diagonal ruler line along the square's diagonal line and adjust your placement along this diagonal until you get the best fit for a 6" square.


You're now ready to make your Pieced Triangles.
Take your remaining Small Triangle squares...

...and cut them all in half diagonally to make small triangles.

Lay your pieces out as shown below - working with solids I placed all my medium shade small triangles to the left and my lighter shade small triangles to the right.

When lining up your triangles for joining, match the centre points perfectly, but you need to ensure you have a 1/4"ish overhang at the other two edges.

Below you can see how the overhang looks from the other side.

Press the seam open.


Then add the final triangle, again ensuring a 1/4" overhang on the two sharper angles.


Any blocks that aren't quite true to the 6" square measurement, as long as they aren't more than 1/8" short, can have the missing section accommodated into the 1/4" seam as shown below where a sliver of grey fabric is missing below the pin.

You can see below how the 1/4" seam should sew right out at the crossing point of the two fabric sections and also how the missing sliver of grey fabric is now 'lost' into that seam and doesn't affect the finished block at all.

Press seams open.

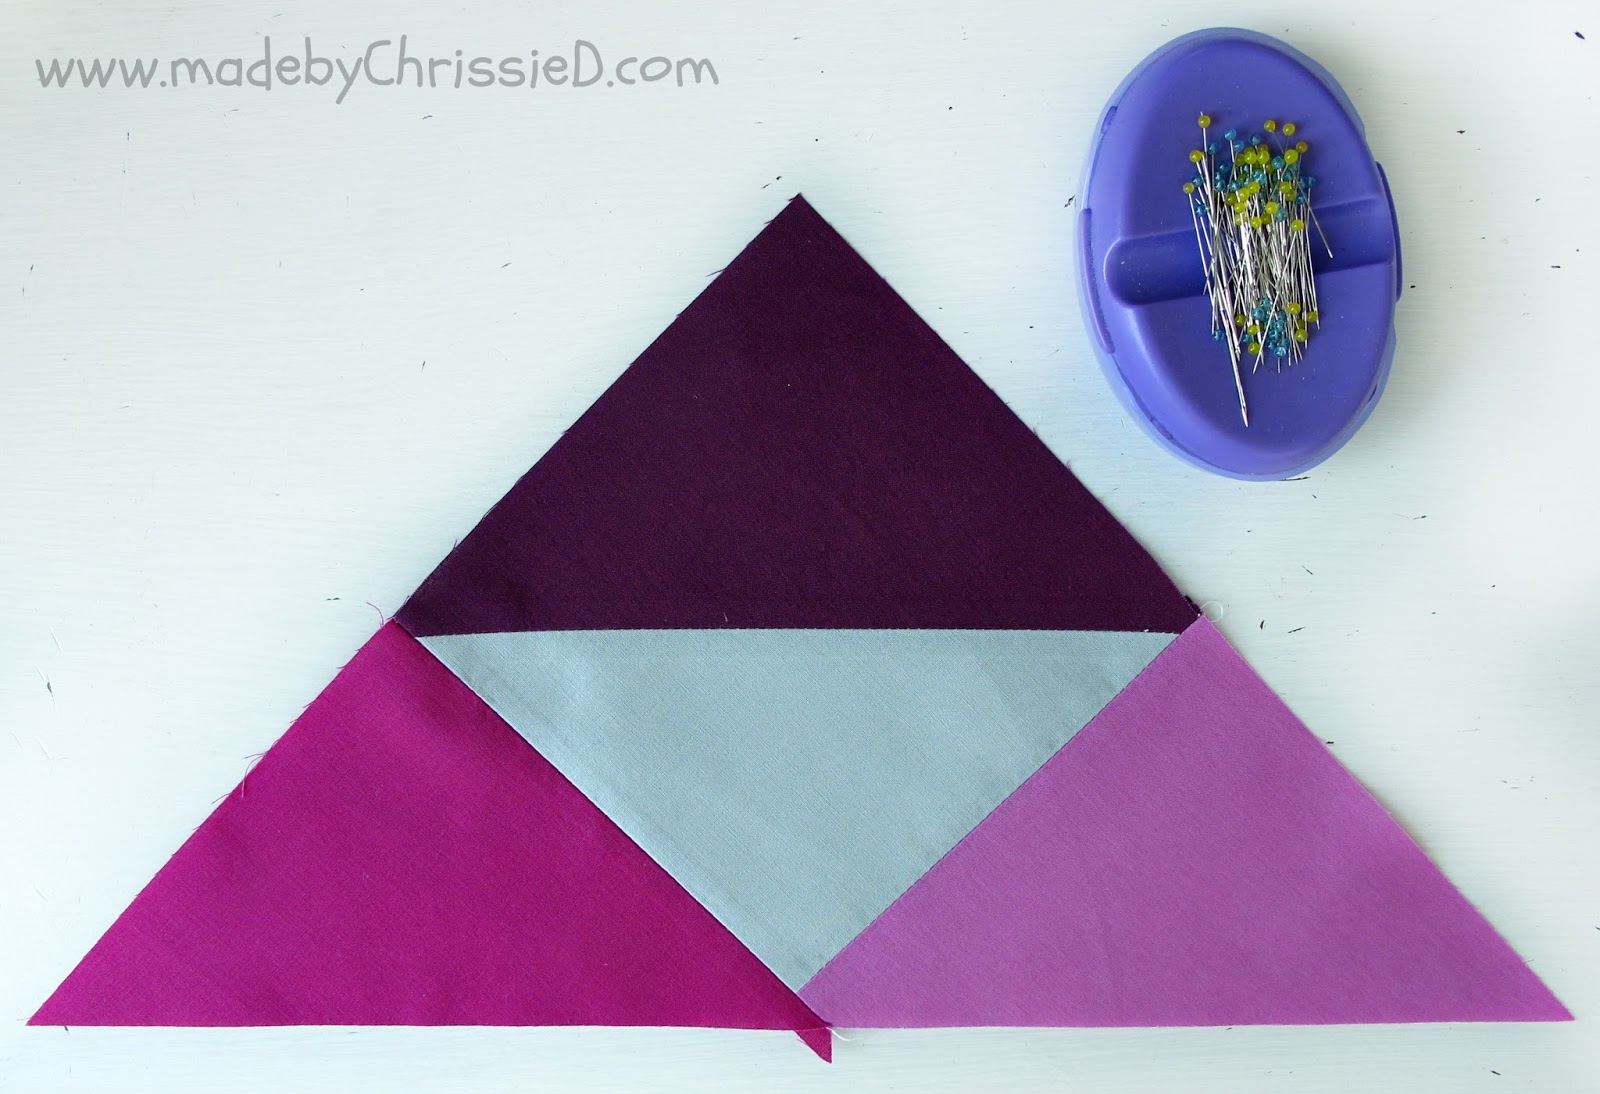
This is how the two seams should now look - having an accurate clean 'V' created by the bottom edge of the two grey seams in this picture will be really important when it comes to piecing your rows later.

You've successfully made one Pieced Triangle.
only 31 more to go!!!

I've got lots more to share with you, so I'll break it down over the week like this (click the links below to visit my posts from other days):
Monday: my fabric choices
Wednesday: Log Cabin Triangles
Thursday: piecing and joining rows
almost there! - Quilting My Yuma
and finally - Yuma QAL - A Finish

Clicking on an image will take you to a new page of crafty goodness :)


Disclaimer: Gotham Quilts supplied the fabrics used at a discount price to mbCD otherwise this post is for informational purposes only, no payment or commission is received on click-throughs and opinions are my own.


Looking great Chris. xx
ReplyDeleteNice tutorial. Great pics so we can really see what you're talking about, thanks!! XX!
ReplyDeleteI love big pictures on blogs Lori, some bloggers unfortunately use tiny pics and it's not possible to enlarge them and see the detail of their work, such a shame - Chris :D
DeleteGreat tutorial x
ReplyDeletei admire anyone who makes half square triangles
ReplyDeleteGreat colors! They sing together so well!
ReplyDeleteI love your colour choices!
ReplyDeleteI may have to join this QAL (better late than never right!?!) love the quiit!
ReplyDeleteYay, delighted you might join in, there's still plenty time, the QAL doesn't end till 19 August and the pattern will remain available indefinitely after that too. If you do join in don't forget to #yumaQAL and #yumaQuilt on Instagram, etc, so we can all share our progress - Chris :D
DeleteWonderful tutorial and love the blocks! Thank you for sharing!
ReplyDeleteThank you for this easy to follow tutorial and lovely clear photos. I'm going to remember your guidance on pressing seams - I can see this is key to getting sharp points as the pieces are sewn together.
ReplyDeleteThanks for dropping by Allison, I was a press to the side girl, through and through, but over the last few years I've learnt from experience I can get crisper and more accurate results in many cases by pressing seams open. These days I decide how to press my seams on a case by case basis rather than having a set rule for one method or the other - Chris :D
DeleteI am bookmarking this in case I try this quilt ... the more I see it, the more I like it!
ReplyDeleteLove this tutorial! Clear and concise...thank you!
ReplyDeleteFabulous color choices!
ReplyDeleteWow that's a lot of triangles!! Beautiful colours too :)
ReplyDeleteI wish I could sew but somehow I never have the patience for it. Thanks for sharing this on the #HomeMattersParty linky and I hope you will come back and share again.
ReplyDelete