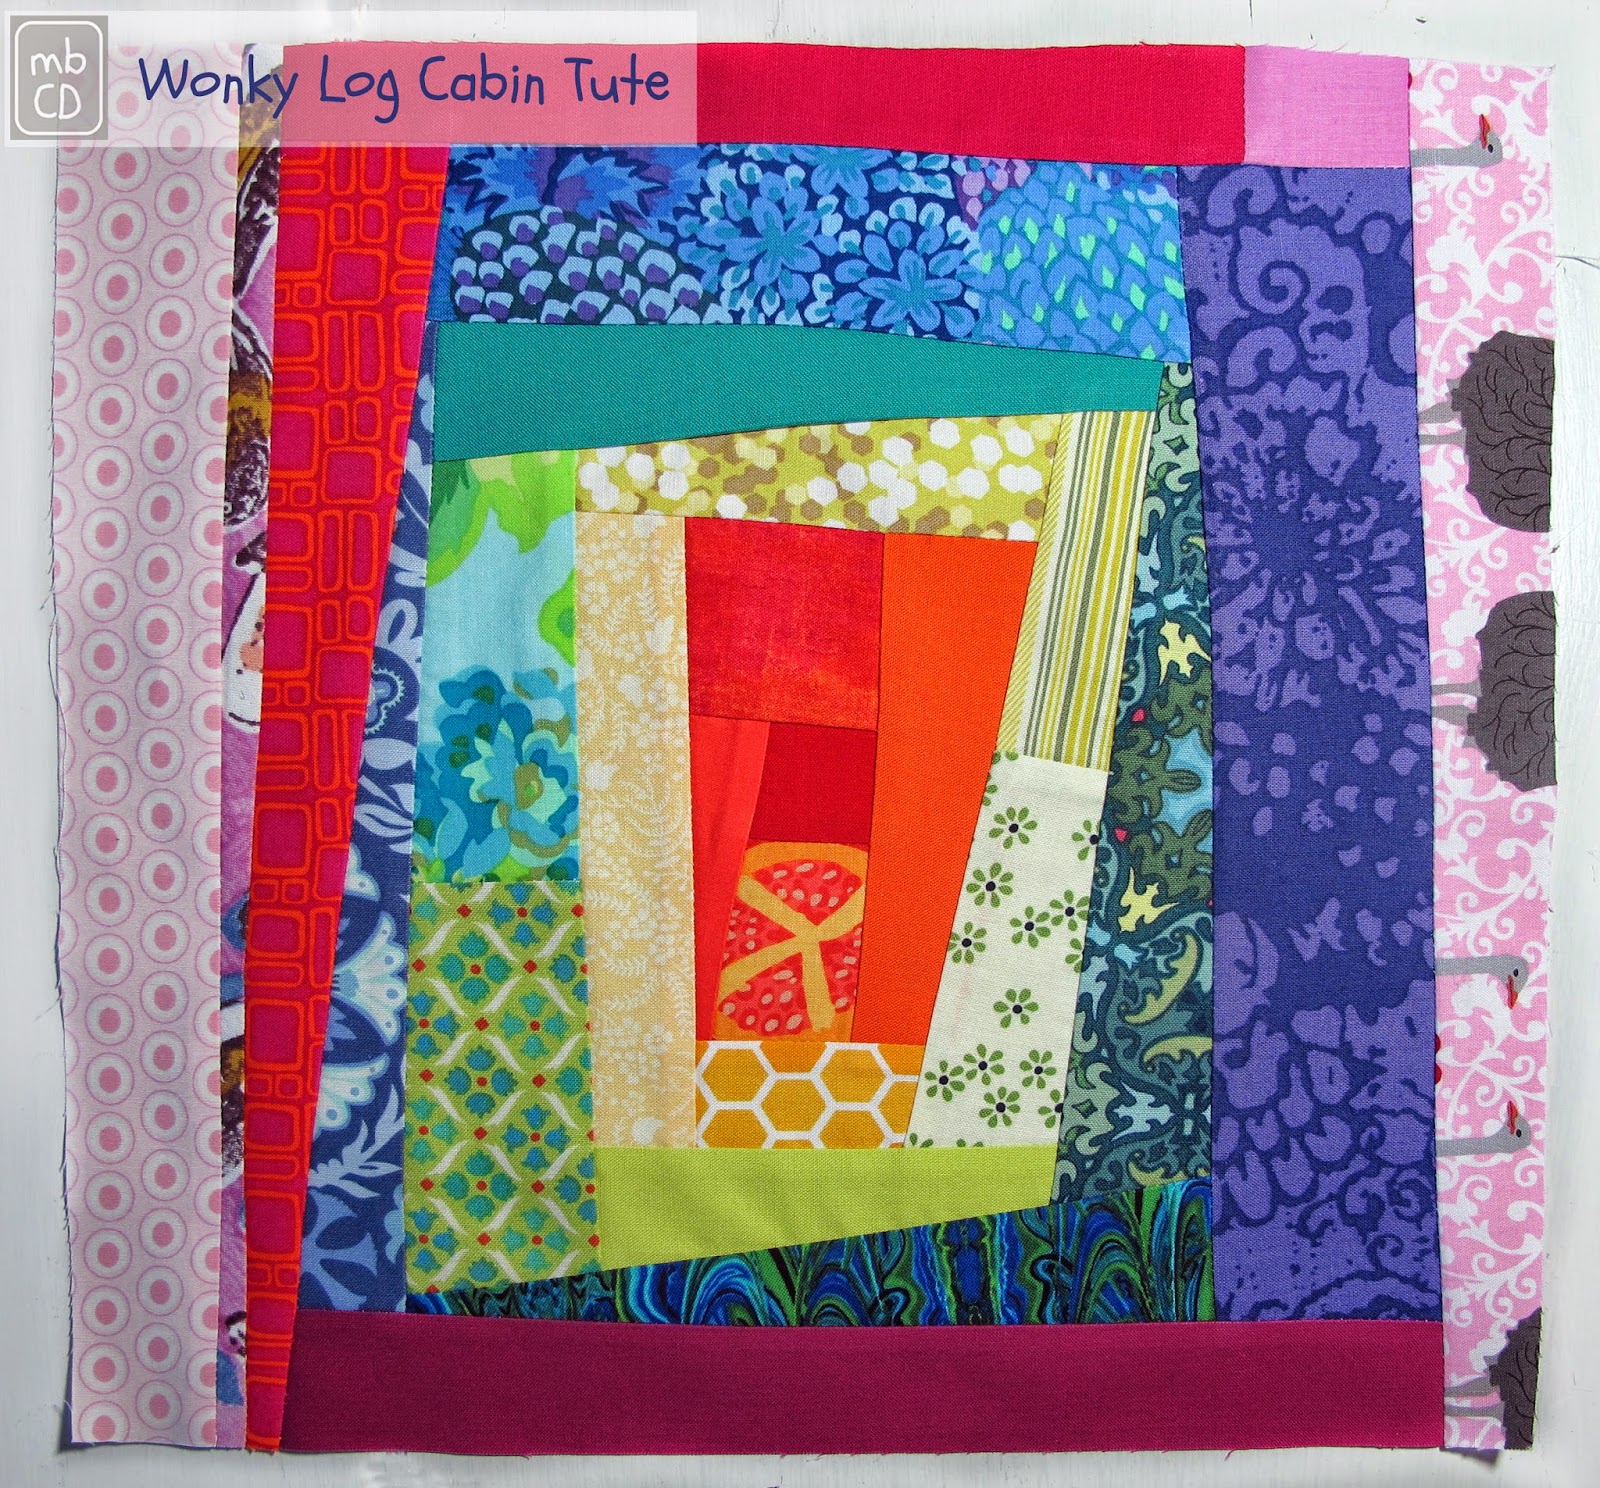
My June Challenge Block for the NYC Metro Mod Quilt Guild is a Log Cabin - Wonky Or Not.
Rules for the challenge:
finished trimmed block is 12.5" square
the centre of the block has to be red
I'm going with a wonky block. I've photographed each stage and created a tute to share with you - there's no set sizes, just go with it until you reach something large enough to trim at 12.5" square.
I started with a centre red square - you can start with anything and it doesn't have to be a square.
I keep my scraps in boxes organised by colour, so I decided to work in this colour order Red, Orange, Yellow, Green, Aqua, Blue, Purple, Pink to create a rainbow block - of course, you can do anything.
Using a 1/4" seam I chose a piece of fabric from the orange/yellow box and sewed it to the red square.
Then I pressed the seam to one side.
Next, I trimmed off some of the fabric I'd just added to make a straight edge in line with the original red square - you can see how I've cut it in the pic below.
Then I added a red/orange solid along the newly created edge of the red square and the orange/yellow fabric.- as always with a 1/4" sewn seam.
Once sewn I pressed the seam to one side.
Below you can see how I trimmed the edges away again - always a straight edge but it doesn't have to be at a right angle (90 degrees) to the adjacent edge - if you want a wonky block then create as few right angles to the centre red section as possible.
This pic shows how I've added a pink/orange strip on the third side of the red central square and I've pressed the seam to the side.
And I've trimmed it along the fourth edge of the central red square, in a straight line ready to add fabric to finally enclose that central section.
And the red centre is now enclosed.
And trimmed
I continue clockwise working my way around and around the centre square adding strips and trimming them straight - but don't forget, not at right angles!
Here you can see me moving from yellow to green and sewing the 1/4" seam. I didn't have a long enough scrap for this side so I sewed two pieces together to create a longer strip.
I carried on adding pieces clockwise in this way until the block was more than the required 12.5" square.
Be sure to use different strip widths and angles each time you straighten the pieces, this is what gives you the 'wonky' effect.
As the block got larger I tried to centre the red central square where the two 6" marks cross on my cutting mat. This allowed me to keep the block centred although the lines weren't parallel and showed me how close I was getting to creating a 12.5" block.
Once the last strip was added to take me over the 12.5" square I trimmed the block back to the correct size.
And here's my finished Rainbow Wonky Log Cabin block
So simple and it's lovely to work quickly without worrying about measurements.
Click here to see other log cabins on my
Quilty - Liberated/Wonky Log Cabin Blocks Pinterest Board.
I've used this tute to make another NYC Mod Quilt Guild Bee Block - totally in love with the fabrics. Click the image to read more:

I was delighted to discover back in May 2015 that the
Emerald Coast MQG were using my tute to make their
June 2015 Block Lottery Wonky ROYGBIV 12.5" Log Cabin blocks.
At the
July meeting the blocks were won by Wendi and passed to Mary McFarlane and here's the quilt Mary's made with them - I love that she's sliced the blocks it makes me feel like we're just peeping at sections of them through windows.
It's such a treat for me when I hear stories like this - thanks, Elaine McMichael for sharing :D
Click these buttons to see more of my NYC Mod Guild blocks and my tutorials
Disclaimer: This post is for informational purposes only, no payment or commission is received on click-throughs and opinions are my own.
Featured On: