

Yesterday, I made a secret project. Obviously, I can't say any more about the who, why, where, when but I can share the what - I've made a sewing basket.
Secret Project: A Sewing Basket

Just over a year ago I made lots of Pixie Baskets using the free online pattern by Heidi over at Fabric Mutt. I took them over to England on a visit and gave them away as gifts, here's my original blog post.

I also have two on the bedside tables in my bedroom, they're great for holding loose change, rings, watch, med bottles, etc. I use mine for my glasses - they're the last thing I take off at night and the first thing I put on in a morning and I like knowing they're in a soft fabric basket and not risking being scratched on the cabinet.
So, when a secret project was called for, I knew exactly what to make and, wanting to make it sewing themed, I also knew exactly what fabric to use.

The fabric collection is Sewing Room by Amanda Murphy for Benartex, you may remember I used it to make this mug rug - more in this blog post which includes a link to my tute on the Benartex Sew in Love {with Fabric} blog.


I adapted Heidi's pattern using a single piece of fabric for the full height of the outside of the basket. This meant I could fit a full spool of thread (does anyone else think it looks like an Aurifil spool?!) on each side.

Instead of adding machine quilting I hand quilted over the stitch line detail on the fabric using a silver grey Aurifil Aurifloss embroidery thread.

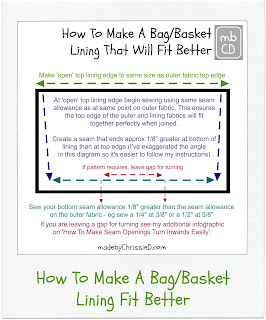
The lining of my basket is snug - I've adapted the pattern for a better fit

and I share my tips in the tute below alongside another tip to make turning the bottom seam of the lining easier.


To hold the lining in place securely I stitch the lining opening closed through all the layers of the basket bottom, stitching in the ditch along the outer seam line.

I made my own tabs using a 2" wide piece of fabric.

I wonder who the intended recipient might be???

Have you made a pixie basket? Any tips or stories to share?
Secret Project: A Sewing Basket
Clicking on an image will take you to a new page of crafty goodness :)


Disclosure:
This post contains a Craftsy affiliate banner for which I am paid commission on click-through purchases. Otherwise, no payment or commission is received for click-throughs to shared links; the post is for informational purposes only and all opinions are my own.
Copyright:


Linky Parties This post may be linked to some great Linky Parties, always a great source of inspiration too. If you click through to my 'Fave Linky Parties' page you can see where I like to share my work.

what a small world I made one yesterday too but mine is not so successful. Not sure where I go wrong but the liming seems too big, mind you I did not have a seam in the bottom.Linings usually cause me a problem when it comes to bags etc though I follow the instructions. Thinking of making one for the bathroom using the special fabric
ReplyDeleteHi Margaret, the lining is too big for the basket, if you follow my tute, as linked to in this post, you should have more success :D
DeleteWhoever the recipient is she is a lucky lady! Great gift Chris. xx
ReplyDeleteWhat adorable fabric, cute little bag!
ReplyDeleteVery nice...actually adorable
ReplyDeleteLucky lady who receives this. Love the fabric.
ReplyDeleteHi Chris,
ReplyDeleteC.U.T.E. OMG - I know I am not the recipient but I sure wish I was. This is adorbs, and the fabric is just perfect. At some point, I'd like to share your tutorial on my blog if you do not mind. Love, love, LOVE it! ~smile~
Roseanne
Hi Roseanne, hehehe, I feel the same and I think I'm going to have to make one to keep now too.
DeleteI'm afraid the Pixie Basket tute isn't mine to share, it belongs to Heidi Staples over @FabricMutt. I'm more than happy for you to link to my post in general though or to my tutes that I've included in the post on how to make a lining fit better and how to turn seam openings inwards :D
This is so lovely Chris, I've been over and found the pattern from Heidi and pinned it already so thanks for that. I'd love to have a go at making a few of these.
ReplyDeleteI am loving how you adapted this to fit your fabric so perfectly. it looks great.
Oh these are so cute! Perfect fabric choices!
ReplyDeleteI have never made a pixie basket but after seeing your I definitely want to! How whimsically useful!
ReplyDeleteCute basket. I absolutely love the fabrics you use! Thank you for sharing at The Really Crafty Link Party this week. Pinned!
ReplyDeleteIt's beautiful and I love the fabric
ReplyDeletePerfect fabric choices, Chris !! Thank you for sharing !!
ReplyDeleteI was the lucky recipient of this pixie basket. I "won" it at a swap at our guild's summer retreat. It sits next to my machine and holds thread, scissors, and so many other little things. Can't imagine sewing life without it. I love it! Thanks Chrissie!
ReplyDeleteWhere did you get that adorbs Aurifil-esk fabric?!!! That basket is too cute!
ReplyDelete