teaching sewing confidence, tip by tip
Showing posts with label pram. Show all posts

Sunday, 27 May 2012

Tutorial: A No Bind Pram/Stroller Quilt

Super soft flannel fabrics
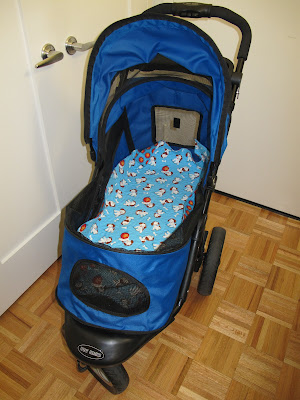
I wanted to make a pram/stroller quilt for Tatty's pram, something to protect the base from muddy paw prints (and other mucky bits!) and that's quick and easy to throw through the washing machine/dryer.  Obviously, it has to coordinate and have an appropriate 'cute' factor so I've opted for Quilting Treasures Poky Little Puppy Flannel in blue and Poky Little Puppy Balls.

In case you fancy making one yourself, I thought I'd share with you a tutorial of how I've made the quilt.

I ironed the fabrics and then cut the 2 pieces to size (42" width x 1/2 yard), removing the selvedge edges, but you adapt this to whatever size works best for your pram/stroller.

Piecing batting scraps
Cut the batting to size, slightly larger than the fabrics - I always use Quilter's Dream Request Cotton Batting - a low loft batting - and this was just the right project to use up some smaller scraps that I had leftover - if you fancy using up your batting scraps then check out my Piecing Together Batting Scraps Tutorial.

Hold fabric in place with tape
Now I fastened the backing sheet to the floor - face up.  You can secure the fabric with masking tape or sellotape pulling it firmly but not out of shape and stick it in place (I find sellotape holds better than masking tape but you have to go by the fabric finish and your floor surface so you don't cause damage to either).

Next lay the top sheet face down directly on top of the backing sheet and fasten this with sellotape also.  When both sheets are secure then place the batting sheet over them and baste with basting/safety pins through all 3 layers.  I use lots and lots of basting pins in my work - it's back breaking stuff but it's the best way to keep the tension and placement across the fabric layers and this ensures that your finished quilt lies flat.  This batting sheet is larger than the fabrics beneath but this can easily be trimmed once the layers are stitched together.


Backing sheet - face up Top sheet - face down Pieced batting laid over Basting pins through all layers

With all the layers fastened together you can lift them from the floor and remove the sellotape.  If you've basted through the tape you can try to pull it away (don't pull too hard and damage your fabric) but not to worry if there's any left - you can remove it later when all basting pins are out.

Stitching the fabric sandwich with
a straight 1/4" seam
Leave 1/3 of bottom edge open
to allow for turning and
on this edge use a 1/2" seam
Trim away excess batting

Using a walking foot or a 1/4" patchwork/quilting foot, sew around four sides of the quilt sandwich (through all 3 layers) - be sure to avoid basting pins as these will break your needle.  I did change my mind and make the bottom edge seam 1/2" to allow more turn back fabric at the opening.  Start about a third of the way along bottom edge of quilt and end a third of the way along bottom edge of quilt - this will leave a gap of 1/3 of width of quilt to turn quilt around to the right side again.  Backstitch a couple of times at the beginning and end to catch your stitches and secure them.  Once you're done you can trim excess batting.
You'll find this method of sewing on and off the fabric makes turning the open seam later for sewing much easier:
Zigzag the raw quilt edges Finished edges and
showing pieced batting
Change to an open embroidery or zigzag foot and zigzag around all raw edges of quilt 2.4 length and 5.5 width.


Turn fabrics through bottom edge openingTurning the fabrics

Remove all basting pins - turn right sides out (batting can be turned to the front or backing sheet side as, at this stage, it is only attached at the seams) and remove any remaining sellotape.


Ironed flat Open bottom seam,
ironed and ready to sew

Iron flat taking care to open out all seams properly and that all four corners are completely turned.  Along the bottom edge iron inwards the opening seam.

1/4" top stitch sewn line top stitch finished edges and corners

Switch to a walking foot or 1/4" patchwork/quilting foot and topstitch around all edges with a 1/4" sewn line - this closes the bottom opening and makes all edges appear the same - you can't see the bottom opening edge now.

Baste quilt sandwich together again to hold in position for quilting.  I didn't tape the fabric down this time - the small quilt size and edge stitching held everything nicely in place and I just put the basting pins through the quilt.

I wanted to free motion quilt this piece - it seemed to me that straight line quilting would be too formal for a fun quilt.  My Bernina has a BSR (Bernina Stitch Regulator) which is perfect for free motion quilting regulating the stitch length for me and reacting to the movement of the fabric rather than me having to use the foot pedal.  If you don't have a BSR the same effect can be achieved using a free motion machine foot/ Bernina Darning foot no 9.

If you're using a BSR unplug the foot pedal and attach the BSR foot.  If you're using a free motion machine foot then attach this to your machine.  Lower your feed dogs.  Stitch length 1.5 to 2.5 - I used 2.0 for this piece.  If you have an extra embroidery thread hole in the finger of your bobbin holder then thread through this as well. Bring the bobbin thread up through the fabric to the top and do a couple of small stitches and cut the threads away so they don't become tangled in your work.

Keep your fabric flat on the machine bed so the stitch is formed in the centre of the batting.


This time, I've used Vermicelli/Stippling stitch - a curving and continuous stitch that never crosses over itself and I'm using a white thread so the stitching is visible but doesn't detract from the fabric print.

When you're done, knot and sew in the thread ends through to the centre of the batting and trim off excess thread.

The finished quilt - front and back

All done, we're loving it and Tatty is raring to go!

Added on 23 June 2013:
Maggie @Flowers in the Window has put the tute to great use, by adding a few ties she's made reversible garden chair covers.  Thanks so much for contacting me Maggie, it's such fun to see how others interpret the tute and this looks amazing :D


This tutorial is featured on:
 Totally tutorials tips tricks recipes how tos

Clicking on an image will take you to a new page of crafty goodness :)

Disclosure: 
This post contains Amazon and Craftsy affiliate links for which I am paid compensation on click-through purchases (at no additional cost to you). Otherwise, the post is for informational purposes only and all opinions are my own.

Copyright: 
Uncredited reproduction of all content, text and images on this site is prohibited.
All content, text and images must be credited to Chris Dodsley @made by ChrissieD and include a link back to this site.

Protected by Copyscape


Craftsy Unlimited FREE 7 day trial at Craftsy.com

Thursday, 24 May 2012

New Fabric Has Just Arrived!

Secret Project II
I love it when fabric arrives in the post - it's a bit of a worry but very exciting when you've not actually seen and touched the fabric but you've committed yourself and placed an order.  Today was a good day and I love everything that's arrived.

This first bundle is for a second secret project that I'm working on so I can't give you any more information but I did take a photo of the fabrics, quite close up and not much detail, so I'm hoping I can whet your appetite without giving too much away.

Tatty's Pram Quilt Fabric


I also got a couple of fabrics from Fabric.com that I'm going to use to make a pram quilt for Tatty.  Poky Little Puppy Flannel in blue and Poky Little Puppy Balls.  This colourway is going to look fab with her blue pram.  I've got a lot on at the moment so I think I'll take the easy option and just do a full piece top and back sheet and a no bind quilt method (check out this great tutorial from Red Pepper Quilts).  I'll keep you posted on how I go on!

Thursday, 17 May 2012

Is That A Dog In A Pram???!!!!!!

View out to the Empire State
I just have to share today's news with you all.  Since last November, I have been walking miles each day to improve my health.  I had an idea that it would be nice to have a dog to walk with me and hence the arrival of Thatcher, known as Tatty to her friends.  Unfortunately Tatty isn't quite so keen on the idea of walking as I am.  By the time we've trotted to the lift, gone down 23 floors and crossed the lobby of our apartment building Tatty's tired and ready to go home.

View down to 1 World Trade Centre
It's been such a disappointment for me, she's at home and I'm still out walking alone but I had an idea - let's get a dog pram.  Hubby, S, took quite some convincing, it's not something that you'd want to be seen with in England - you'd be laughed at in the street, but we'll be walking around Manhattan, Hoboken and Jersey City and here, anything goes.
 
So the pram, a top of the range Pet Gear AT3 Generation 2 All-Terrain Pet Stroller arrived today and we were straight out of the door to enjoy the lovely weather and do a bit of shopping in Hoboken.  Tatty took turns at walking and then riding in the pram when she was tired and best of all she loved it.  A few people did do a double take, a woman in a car was heard saying "did you see that dog in a carriage?".  Meeting up with us on her way home from school, our daughter, F, completely disowned us but I don't care, we'll be out again in the morning doing a good 5 miles, Tatty and me, the two of us together.  Lovely x


Updated at 14 May 2014

I'm very pleased to be able to report that Tatty graduated from her pram later in 2012 and has been happily walking on all four legs ever since!!! :D