I'm off to Japan on Friday morning for several weeks. The first week my husband is working so I'll be exploring Tokyo alone and maybe, just maybe, there'll be fabric involved at some stage ;D Weeks two and three we're on vacation and travelling a little further to Mt Fuji, Nara, Kyoto, Osaka, Miyajima, Kurashiki and Hiroshima.
As always tips, recommendations and coffee/lunch invitations are very welcome :D
While I'm in Tokyo I'm spending a day with one of my students from Manhattan who has recently returned home to Tokyo after seven years in NYC. This was her wonderful leaving gift to me just a few weeks ago.
Since her arrival home, Aya has given birth to her first son and I've made this snuggly to give to her when we meet up.
Do you need a baby gift? - you really can't go wrong with a hand tied snuggly so I've put together a tute.
20" HAND TIED SNUGGLY TUTE
Materials:
20" x 20" square flannel fabric
20" x 20" square Sherpa fleece
90" x 2-1/4" fabric for binding
matching or contrasting thread for sewing binding
matching or contrasting embroidery thread for hand tying (you'll need approx 5" thread for each tie)
Tools & Notions:
basting pins (or spray baste if you're happy using it for baby items)
embroidery needle
small scissors
measuring ruler/tape
Place flannel and Sherpa fleece squares wrong sides together and baste together ready for sewing.
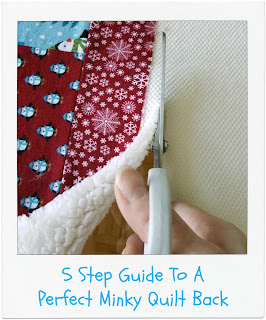
Working With Minky
Zig zag around all four sides of fabric square - I use the widest zig zag stitch my machine can do - 5.5 mm.
Add binding using your favourite binding method. I'm machine sewing my binding so I've sewn the binding to the fleece side first (above pic) then turned the binding to the flannel side to do the final visible stitching.
I've used a blanket stitch to sew my binding in place - I'm a huge fan of using decorative stitches to machine sew the binding.
Once the piece is bound it's time to finish with some hand tying.
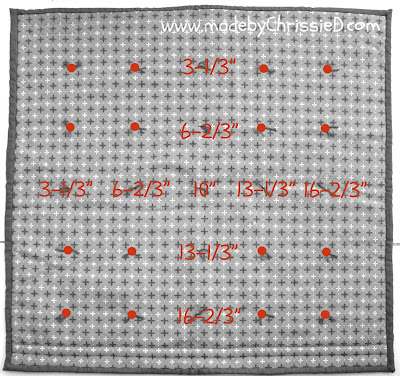
Using a non-permanent marker, mark the chosen tying points on your snuggly.
For a 20" x 20" snuggly there's three good hand tying options:
9 x 5" apart ties;
16 x 4" apart ties;
and 25 x 3-1/3" apart ties.
It's useful to know that creating each tie uses approx 5" embroidery yarn but the final choice obviously is yours and for a tute within a tute here's my technique for
HOW TO HAND TIE A QUILT
To start:
Thread your embroidery needle with embroidery yarn that's twice the length from your hand to your elbow (that's the longest pull you can physically achieve, helps prevent knotting from too long a length of thread and stops thread becoming damaged from passing too many times through fabric during sewing).
Tying Steps:
1: From the top of the quilt put the needle through all the quilt layers at your marked tying point - leave a 2" thread tail on the quilt top.
2: Bring your needle back up through all the quilt layers approx 1/8" from the first needle entry point.
3: Ensure there's still a 2" thread tail visible at the first needle entry point.
4: Put the needle back into the first entry point again and passing the needle through all the quilt layers.
5: Bring the needle back up again through the same return point as in Step 2. Don't pull the thread tight through the quilt, leave a small loop of thread visible on the top side of the quilt.
6: Pass the needle through the raised loop on top of the quilt...
7: ...this ensures the tie is fully tied together and not simply looped through the fabric.
8: Pull the tie ends until the tie lies flat against the quilt - it should be firm but not overly tight causing the fabric to pucker (unless, of course, this is the effect you want to achieve).
9: Tie the thread ends into a knot.
10: Add another knot - creating a double knot.
11: Ensure knot is firmly fastened and lying snuggly against quilt surface.
12: Trim both thread ends to chosen length - I like a 1" length, I think if the knot was to loosen at this length it is less likely to come undone than if it were shorter.
The flannel's from my stash, I don't think it's available anymore - Quilting Treasures: Poky Little Puppy and the Sherpa fleece is a 5 mm ivory, also from my stash.
Snuggly Pattern Available In 3 Sizes
Update at March 2016:
Aya sent me this photo of her son, Yu with his hand-tied snuggly, it makes my heart sing and he's just gorgeous :D
Made by You:
Here're some images of snugglies 'made by you' using my tutorial.
Thanks for contacting me, it's such fun to see how others interpret my tutes - Chris :D
20" HAND TIED SNUGGLY TUTE
Featured on:
Clicking on an image will take you to a new page of crafty goodness :)
Disclaimer: This post is for informational purposes only, no payment or commission is received on click-throughs and opinions are my own.
Click to follow me on
Linky Parties
This post may be linked to some great Linky Parties, always a great source of inspiration too. If you click through to my
'Fave Linky Parties' page you can see where I like to share my work.


