

Last week, when I used these two panels to make my Santa Sack tute for the Benartex blog Sew in Love {with Fabric, } I promised you there'd be no wastage. Keeping my promise here's a Fabric Coaster Tute to make good use of those sixteen left over Christmas Scene squares.
Don't worry, even if you don't have this panel I'll include instructions to make Fabric Coasters in general, they don't even have to be Christmas themed!

If you're using different fabrics click here to jump to the instructions for all fabrics.
Happy Holidays Snowmen Fabric Instructions:
For those who are using the Benartex Happy Holidays Snowmen panel nip over to the Sew in Love {with Fabric} blog and cut your Christmas Scene strips as detailed there in my Santa Sack tute, once you've done that come back and I'll carry the instructions on here from that point.
Cut away the remaining selvedge strips at 1/2" from each Christmas Scene strip.
Cut away the remaining selvedge strips at 1/2" from each Christmas Scene strip.

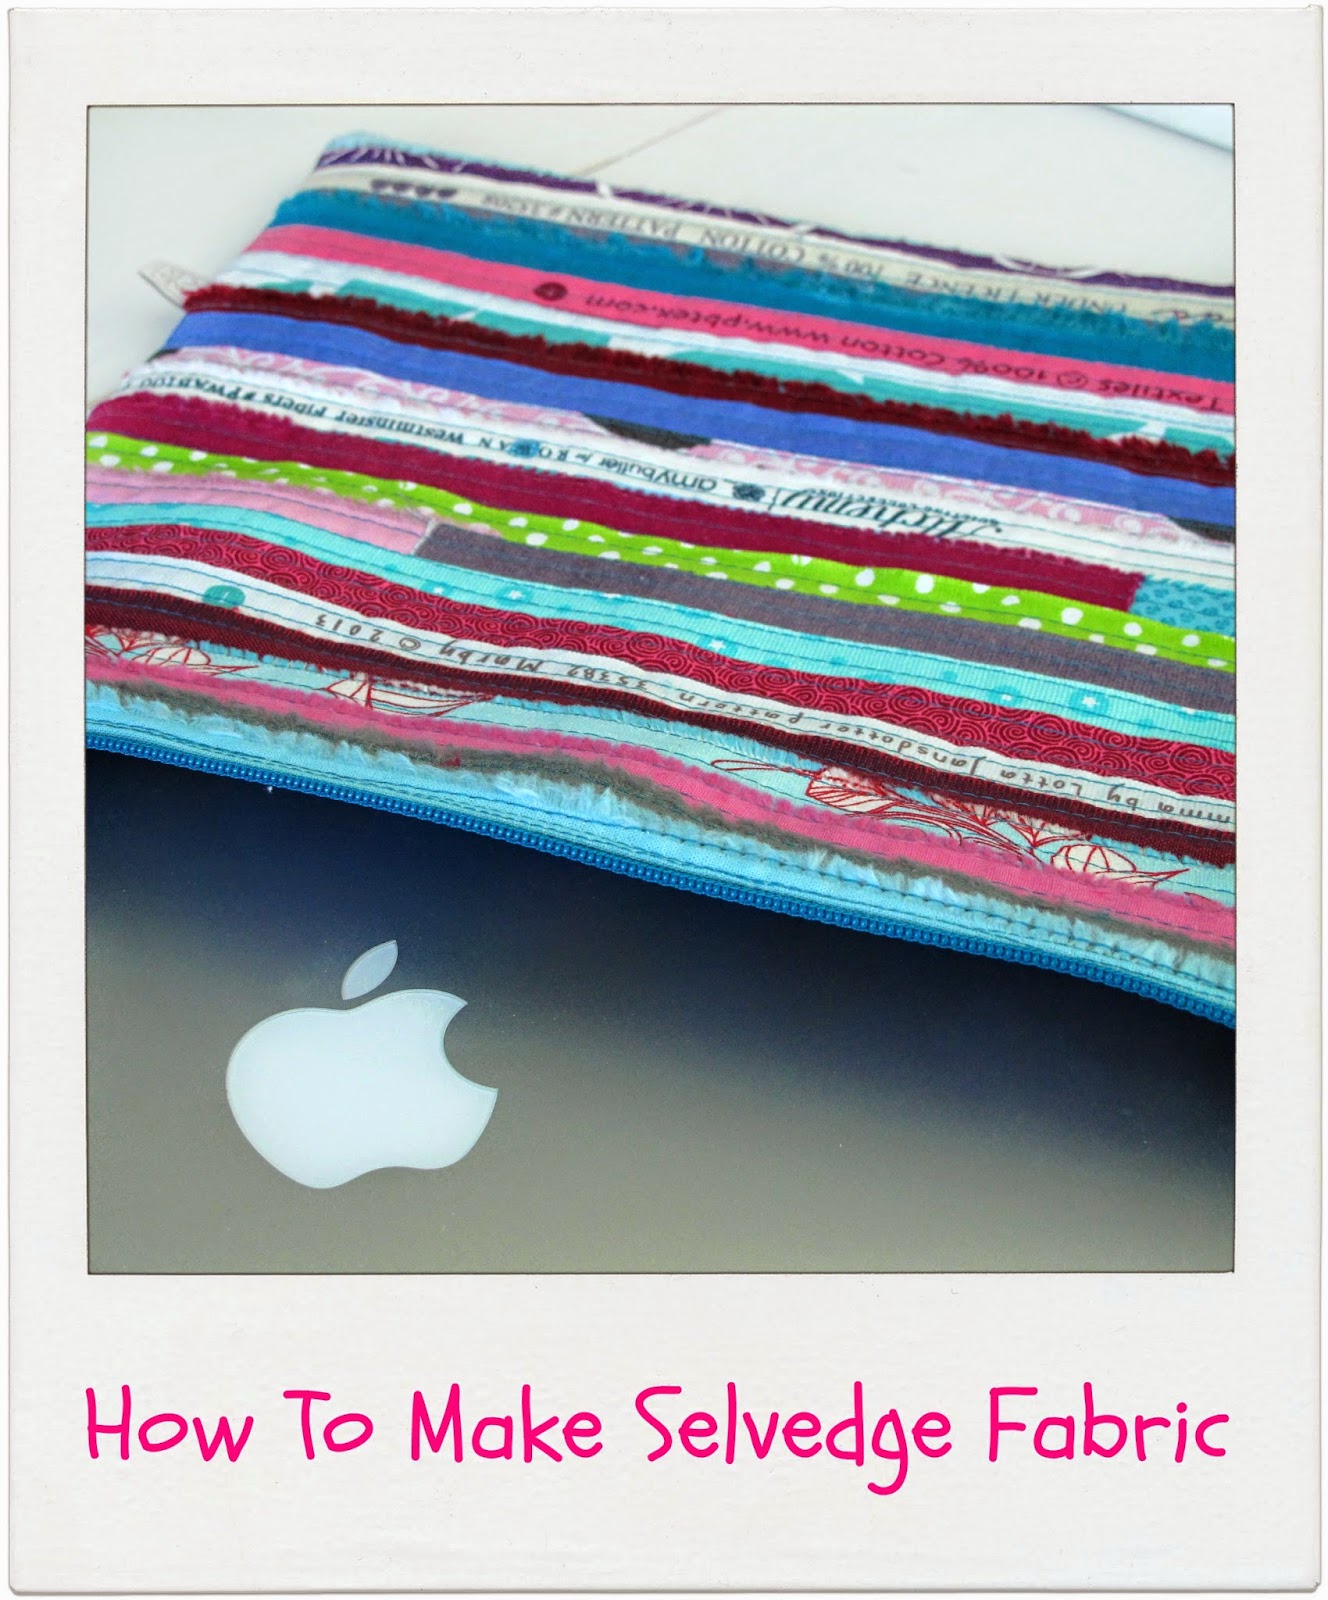
You'll be left with 4 strips of selvedge, remember I said no wastage?

- save these and make your own selvedge fabric using my Selvedge Fabric Tute!!!

- save these and make your own selvedge fabric using my Selvedge Fabric Tute!!!
Trim the Christmas Scene squares down squarely - the panel print isn't always a perfect square so go with a wonky look - what's important is that your trimmed square is square. There's approximately an inch between each square image so aim for the 1/2" mark between each square but most importantly keep a horizontal line on your ruler level with the top or bottom edge of the strip to ensure 90-degree angles for the sides - the cut square should measure about 5-7/8" square.

And now you've got sixteen of them!

You can make fabric coasters using any size fabric just cut a front and back square of fabric to the same size and a square of batting 3/8" smaller than your fabric squares. The coasters I'm making are 5-7/8" fabric squares with 5-1/2" batting so I'll be quoting measurements for this size in the tute.
Materials For Each Coaster:
Top Fabric - (1) 5-7/8" fabric square
Backing Fabric - (1) 5-7/8" fabric square
Batting - (1) 5-1/2" batting square (fusible or normal batting)
Thread
TIP: two 18" x 22" fat quarters will make nine coasters.
Additional Notions:
If using normal batting either Basting Spray OR (1) 5-1/2" square lightweight fusible web
That Purple Thang (or another form of corner turner)
Cut your batting - I'm cutting (16) x 5-1/2" squares of batting - you can use fusible or normal batting, my preference here is fusible but in this tute, I'll show you how to work with both.
You don't have to be hugely accurate cutting the batting - you just want the batting to be smaller than the fabric so it isn't part of the sewn seams and allows the coasters to lie flatter. You can see in the pic below that I didn't worry about that wonky left side edge when cutting to size.

I layered up 5-1/2" strips of batting on top of each other and cut 5-1/2" squares from it two at a time so I could work faster.

Sixteen batting squares.

As I mentioned previously there's three methods you can use to join your pieces: fusible batting; basting spray; and fusible web; I'll show you how to do each.

Method 1: Fusible Batting
This is the fastest and least messy method, I'm using double sided fusible but you can also use single. If you haven't tried fusible batting yet read my review in this post.
This is the fastest and least messy method, I'm using double sided fusible but you can also use single. If you haven't tried fusible batting yet read my review in this post.
Press the back of the top fabric to the fusible batting until the two adhere. Repeat for each coaster.

Method 2: Spray Baste
Spray one side of batting lightly with spray baste

then press to back of the top fabric.

Press to finish. Repeat for each coaster.

Method 3: Fusible Web
Place square of the lightweight fusible web on batting and press over the fusible paper to fuse layers.

When cool remove fusible paper.

Then press batting square to the back of the top fabric to fuse. Repeat for each coaster.

Whatever method you use each coaster should now look like this...

...and a pile of sixteen looks like this!

Cut your 5-7/8" backing squares.
I've cut sixteen using two different fabrics, holly leaves and red stripes, eight of each.
I've cut sixteen using two different fabrics, holly leaves and red stripes, eight of each.
Make sure you have the top fabric facing up and place the backing fabric right sides together with the top fabric. Below you can see I've started to place my backing fabric on my top fabric/batting squares - just the red stripes are done in this pic.

Leaving 2/3 of one side open sew a 1/4" seam around every edge of each fabric coaster pairing. You can sew on and off all four fabric edges or pivot at each corner, it's up to you.
TIP: if you use my method for sewing on and off the fabrics it'll make turning in your finished seams later super easy - no fiddling trying to fold in your edges for the final join and attempting to press in place and burning your fingers. Using this method the fabric does all the work for you and automatically turns the seams inwards, trust me it works!!!
TIP: if you use my method for sewing on and off the fabrics it'll make turning in your finished seams later super easy - no fiddling trying to fold in your edges for the final join and attempting to press in place and burning your fingers. Using this method the fabric does all the work for you and automatically turns the seams inwards, trust me it works!!!

Here's how the stitching looks on the fabric - you can just about see my grey sewn line but I've added dotted arrow lines to help.

Clip four corners.

Clips the corner diagonally...

... then do the tiniest scissor nick towards your corner stitch but DON'T cut those stitches!!! This makes the corner more flexible when it's turned.

Turn to right side and...

...poke out those corners. I'm using my That Purple Thang to help push them right out.

See how the fabric turns itself inwards along the open seam, isn't that amazing?!!!

The top fabric should be enclosing the batting and the backing fabric folds inside onto the top fabric.

Pin the open edge in place and press.
This is where using double sided fusible comes into its own, both sides of your fabric are now fused to the batting. Don't worry if you didn't use double sided fusible a few quilted lines will soon have everything held together anyway.
This is where using double sided fusible comes into its own, both sides of your fabric are now fused to the batting. Don't worry if you didn't use double sided fusible a few quilted lines will soon have everything held together anyway.

Sew a 1/8" top stitch line around the whole coaster. I've used a 4.0 mm stitch as I like a longer stitch for visible stitching, I think it looks a little more hand sewn! but this is a totally personal preference, use whatever length stitch you think looks good. I'm using Aurifil 2600 Dove (grey) in a 50 wt but this is a great time to consider other colours and thread weights, maybe a heavier 40 wt for a more visible stitch and a colour to match or contrast with your project.
If your machine has a 'knotting' stitch you can make use of it here, if not you can overlap your first and last stitches.

On this corner stitch, I'm leaving my machine needle down in the fabric to allow me to pivot at the corner.

If you've used a knotting stitch you can trim your threads right up close to the coaster or bury them, if you don't have that stitch handknot your thread ends, bury them and trim excess.

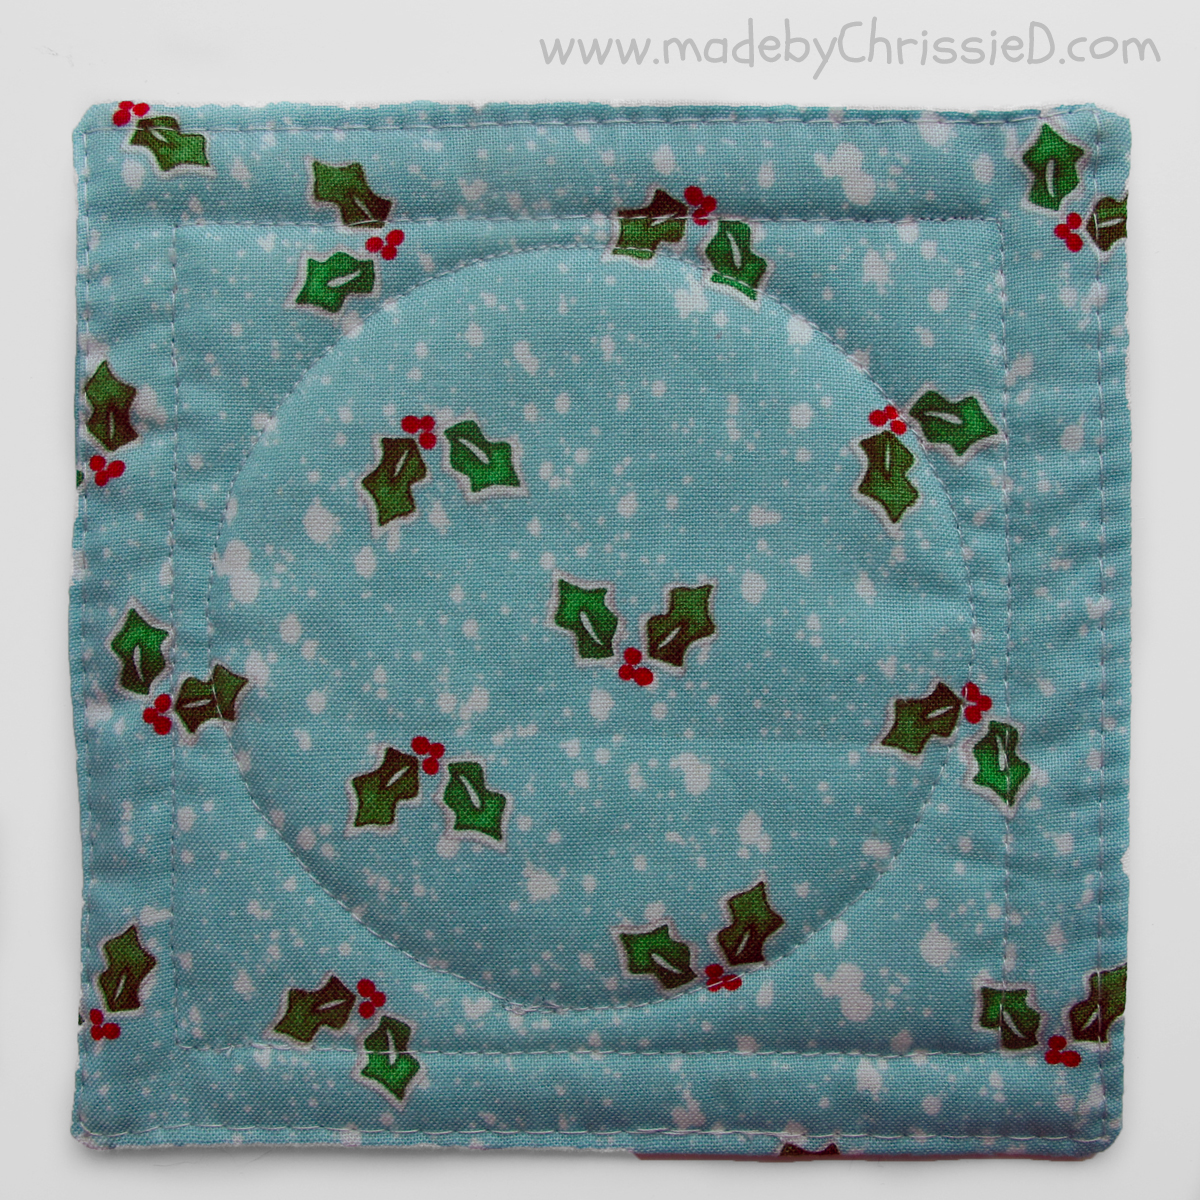
To quilt or not to quilt:
If you've used double sided fusible there's no need to do anything else, your coasters are good to go. Other quilting ideas are to fmq around the design on the coaster or a simple straight line, zig zag or stipple quilting.
For my coasters, I've used a straight stitch. I've quilted around the coaster borders and then I've sewn around the centre circle. The circle has a fairly shallow curve so go slowly and you'll be able to turn your coaster under the foot and keep in line with the circle. If you've used a 4.0 mm stitch you might want to make this stitch a little shorter, a shorter stitch allows for easier curves when sewing circles.

Here's one set of four coasters finished.


And here's the sixteen finished coasters cut from the two original panels.


Fabric coasters are perfect gifts any time of year - teacher and hostess gifts, housewarming and I'm sure you can think of lots more ways to share them. They're a great way to introduce seasonal fabrics into your home too.
Who will you make some for?
Featured on:


Clicking on an image will take you to a new page of crafty goodness :)


Click to follow me on

Disclaimer: Some of the fabric used was supplied by Benartex at no charge to mbCD otherwise this post is for informational purposes only, no payment or commission is received on click-throughs.
Linky Parties
This post may be linked to some great Linky Parties, always a great source of inspiration too. If you click through to my 'Fave Linky Parties' page you can see where I like to share my work.
Great tips in your tutorial, thanks!
ReplyDeleteSo cute and a great tutorial!
ReplyDeleteGreat fabric for a project like this, and they'd make a nice gift. Thanks for the tutorial!
ReplyDeleteA really nice tutorial, thank you! Now I'm off to check out your review of the fusible batting...sounds useful!
ReplyDeleteWhat a great way of using up the remainder of the panel fabric Chrissie! I am sure that I have similar fabrics in my stash :)
ReplyDeleteWhat a clever way to spare those leftover bits from the scrap bin!
ReplyDeleteThose are so very cute! Love the snow globe look of them. Thanks for the tute. There will be some lucky people on your gift list!
ReplyDeleteThat is going to be an easy tutorial to follow. I have tons of batting scraps that I'm accumulating, and I have been pondering what I should use them for. This is a perfect use! Like you said, 'no waste!' Thank's for sharing. I'm visiting from TGIFF.
ReplyDeleteOh aren't they cute! I can't believe it's time to plan Christmas though!!
ReplyDeleteI love your Coasters! Thanks for a great tute! :)
ReplyDeleteNice tutorial! Thanks for the directions and wonderful pics. These will make sweet gifts. Visiting from WTDW. Happy August :)
ReplyDeleteGreat tutorial. Thanks for sharing!
ReplyDeleteI love coasters but don't like heavy ones. Your cloth coasters would be perfect and you have done a wonderful job on the tutorial for making them. Thank you for sharing with the Clever Chicks Blog Hop! I hope you’ll join us again next week!
ReplyDeleteCheers,
Kathy Shea Mormino
The Chicken Chick
http://www.The-Chicken-Chick.com
These are adorable and would make great DIY gifts: Christmas, Housewarming, or Birthday.
ReplyDeleteLovely coasters. You're getting ready for Christmas early!
ReplyDeleteSuper cute for the holidays! Would be perfect hostess gifts.
ReplyDeleteSusie
Great idea and wonderful tutorial that I will refer to in the future! So glad you rejuvinated this one at Tuesday ARchives this week. :)
ReplyDeleteSo cute!
ReplyDeleteToo cute! Thank you for sharing this tutorial. 🎄
ReplyDeleteThese are adorable. Love that fabric! What would you suggest to put in the sandwich to make the coasters more drip resistant? I drink lots of iced tea and ice water and find myself having to change out my coasters or mug rugs during the day so they can dry out and I don't end up with white spots on my wood furniture. Thanks abunch for the cute gift ideas and sharing the free patterns!!
ReplyDeleteHi Judy - your comment didn't come through to my emails and I've only found it now as I was looking through some old posts so I apologise for the delay in getting back to you. To answer your question my suggestion would be for you to take a look at my laminated mug rug tute - I think laminated fabric could be the answer to your white spot problem on your wood furniture. If you made the coasters with laminated fabric the moisture wouldn't soak through the coaster and they can be wiped clean. You might want to make them slightly larger than I've said in this tute to make turning them from the inside out easier but some laminates are incredibly soft and you could do this with no problem at all. If you can't find laminate you could insert a piece of shower curtain or wipe clean kitchen table cover inside the coaster with the batting. Hope these suggestions are useful and not too late to save your furniture?! Have a great week - Chris :D
DeleteThese are super cute. I have tried using panels before, but the panels I seem to find do not have much space between the pictures and so are very difficult to cut out and sew.
ReplyDeleteIndeed sometimes the gaps in panels are really small - cutting them with scissors can allow you to be more careful, certainly don't try to cut them still folded on the centre fold line. Even when I worked in a store we cut panels with scissors as you need to be so precise with them - Chris :D
Delete